Check Sheets
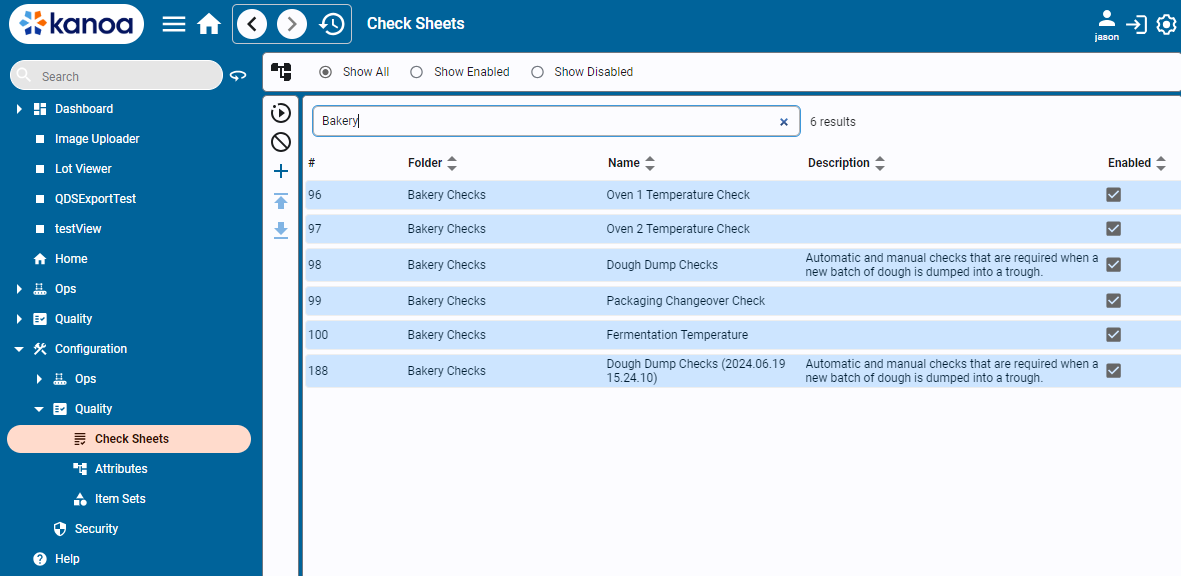
The Check Sheets configuration Screen allows a user to manage all aspects of check sheet configuration. You can add a check sheet or click on an existing check sheet to edit or delete it.
The Check Sheet Editor allows you to create a set of checks that are required to be performed.
The ![]() button allows you to switch between editing and viewing the check sheet.
button allows you to switch between editing and viewing the check sheet.
You will need to enter a name for the check sheet before you can do anything else with the check sheet.
The 'Estimated Minutes' Field allow you to set the expected duration it should take for a manual check sheet to be filled out. Entering a value here will automatically
create a check item for 'duration' that a user will fill out. This provide information on how long a set of checks actually takes.
The ![]() Close button will exit the editor and return you to the Check Sheet Table.
Close button will exit the editor and return you to the Check Sheet Table.
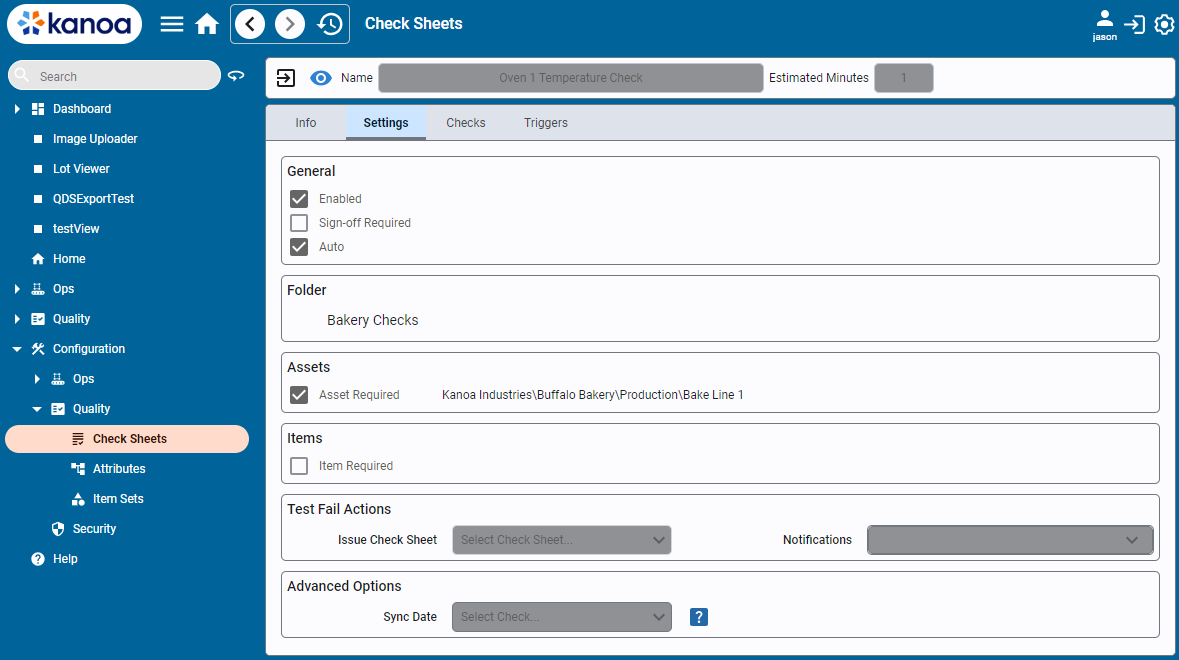
Check Sheet configuration is divided across the following tabs...
- Info: You can add a descriptive field about this check sheet and link it with other documents such as SOPs.
- Settings: General settings
- Checks: Add specific checks that need to be carried out
- Triggers: Add triggers that will cause this check sheet to be scheduled or automatically executed
Check Sheet Settings
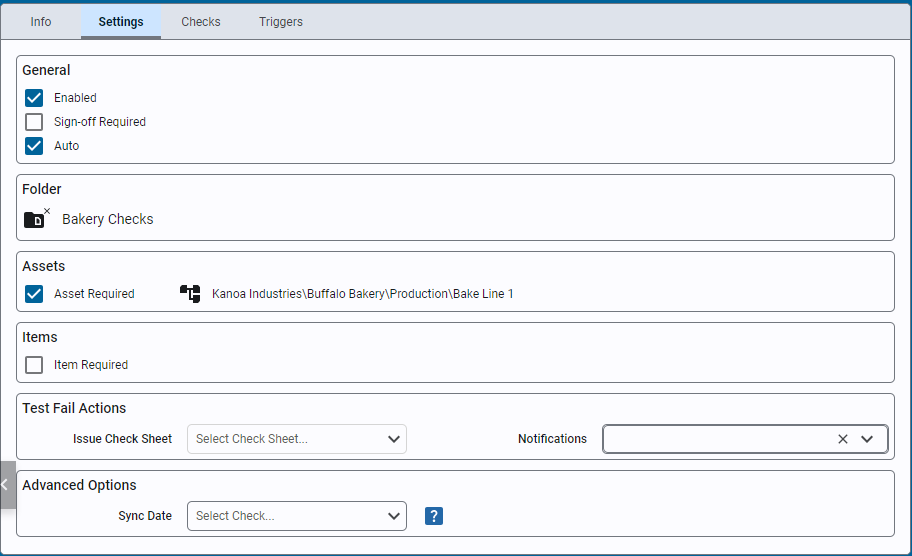
- Enabled: Enable or disable a check sheet.
- Sign Off Required: Require a sign off for approval. If unchecked a submitted check sheet is automatically moved to the 'Approved' Status Only approved checks ar eused in SPC analysis.
- Auto: Indicate that this check sheet only contains checks whose values will be automatically captured when the check sheet is triggered.
- Folder: Saves the check sheet in a specific folder.
- Asset Required: Determines if an asset must be selected for this check sheet.
- Item Required: Determine if an items must be selected for this check sheet.
- Issue Check Sheet: Choose a check sheet to schedule immediately upon test failure.
- Notifications: Select a team or user for email notifications on test failure.
- Sync Date: The 'Taken Date' of the Check Sheet by default is the date the check sheet is submitted. You can override this to force all check items and the check sheet itself to use the datetime picked for a check that is of datetime data type. This can be used when all check items are to be referenced to say the 'code time' printed on a product. To use this feature, simply create a check item that is of data type 'datetime' and then select it in this dropdown. When the user selects the date time, it will now be used for the 'Taken Time'.
Check Sheet Checks
A check sheet can contain any number of checks and checks can be grouped together logically. Click the ![]() to add a new check or
to add a new check or ![]() to edit an existing check.
to edit an existing check.
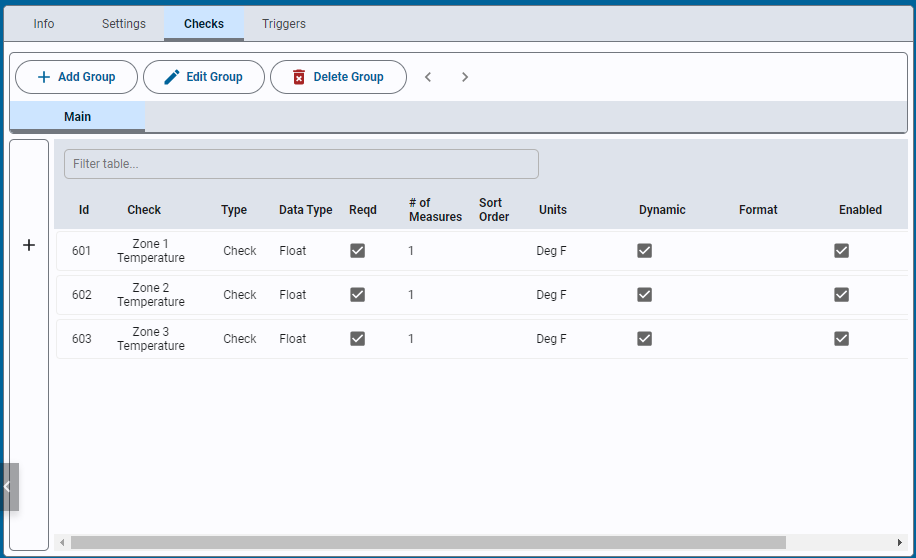
The Check Item Editor allows you to create the specific checks to be taken. Checks can be manual entry, automatically pulled from PLC tags or calculated based on the value of other checks taken.
Check Item Settings - General
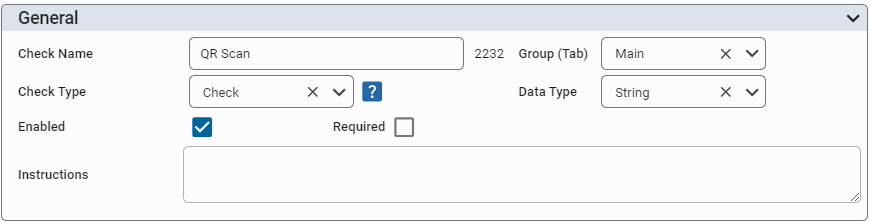
Give your check item a name and assign it to a group. You can enable or disable it and determine whether it is a required or optional check. You can also add instructions that are displayed to the user when they select this check item.
Check Type
There are several check types you can select from...
- Check This is the main check type in that this check item will receive a value and store it against this check item.
- Calculated A calculated check will perform a custom calculation based on the values of other check items. Those check items can be check types or calculated types themselves.
- Trigger A trigger check is used to trigger the capture of other check item values.
Data Type This property defines the expected type of data expected to be received by this check and this selection drives other check item selections, including the component presented to the use to input the value. Options are Boolean, Datetime, Float, Geo Location, Image, Integer, String.
Check Item Settings - Data Properties
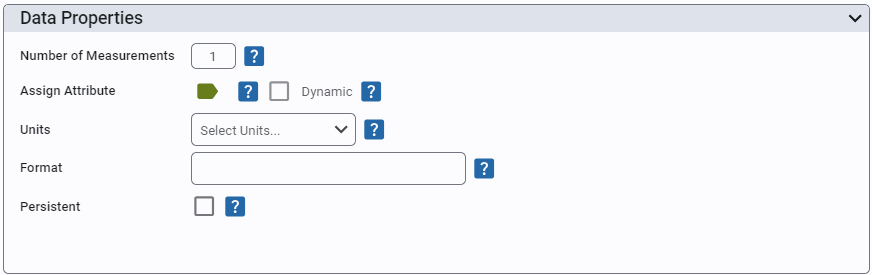
- Number of Measurements: Set the # of measurements to be taken for this check. Allows for within-subgroup variance analysis.
- Assign Attribute: Attributes are used to associate a check with a tolerance spec and a data source tag path.
- Dynamic: When enabled, this check item will only be shown when a valid tolerance can be found for the associated attribute. Usage is to prevent displaying checks that may not be valid for certain items (products/materials).
- Units: Define engineering units for data display.
- Format: Enter a format string for data presentation following the custom numeric string format i.e. #,##0.##
- Persistent: When enabled, persistence will copy over the value entered the last time this check was taken. If asset and/or item is required, it will use previous value for that asset/item combination.
Check Item Settings - Entry Options
Entry Options allows you to present the user with a number of different ways to enter in a value for a check item. You don't need to provide an entry option, a standard text field or numeric input field will be prsented to the user and keyboard entry is always permitted (but validated).
The entry options that can be selected from vary based on the check item data type....
Boolean Data Type
- Boolean: Generates buttons based on values defined in the picklist values. Pick list values are in json format. 'TRUE' defines the button(s) that will yield a 1 result, 'FALSE' a 0. i.e. {'TRUE':['Yes'], 'FALSE':['No']}
Integer and Float Data Types
- Number: Generates buttons from attribute tolerance if it exists otherwise uses values defined in the picklist values. Pick list values are in json format. 'denominator' defines the increment part (0.1 will generate 0.1, 1.2, .3 etc. ). 'lel' and 'uel' defines the lower and upper value range, 'ucl', 'lcl', 'lsl', 'usl' defines the spec limit. i.e. {'denominator':0.5, 'lel':1,'lsl':1.1, 'lcl':1.8, 'tgt':2, 'ucl':2.2, 'usl':2.6, 'uel':3}
- Time: Presents the user with a time key pad to enter duration in hours, minutes and seconds for a check. The value is stored in seconds i.e.
- Fraction: Generates buttons from attribute tolerance if it exists otherwise uses values defined in the picklist values. Pick list values are in json format. 'denominator' defines the increment part (0.1 will generate 0.1, 1.2, .3 etc. ). 'lel' and 'uel' defines the lower and upper value range, 'ucl', 'lcl', 'lsl', 'usl' defines the spec limit. i.e. {'denominator':0.5, 'lel':1,'lsl':1.1, 'lcl':1.8, 'tgt':2, 'ucl':2.2, 'usl':2.6, 'uel':3}
String Data Type
- Tree: Generates a tree selector. Selection options are generated from a comma separated list. Each option must be wrapped in single quotes and use / to create the tree structure. i.e. ['Kanoa Industries/T1-Acme, TX', 'Kanoa Industries/T2-Acme, TX', 'Tagseth Enterprises/P1', 'Tagseth Enterprises/P1/Line 1', 'Tagseth Enterprises/P2/Line 2']
- Text: Generates buttons with the text defined in the pick list values. Pick list values are in json format. i.e. {'PASS':["Perfect", "Good"], 'WARNING':["Fair", "Average"], 'FAIL':["Bad"],'NEUTRAL':["Doesn't Matter"]}
- Boolean: Generates buttons based on values defined in the picklist values. Pick list values are in json format. 'TRUE' defines the button(s) that will yield a 1 result, 'FALSE' a 0. i.e. {'TRUE':['Yes'], 'FALSE':['No']}
- Barcode Scanner: Provides a button that will uses a mobile devices camera to scan a barcode. Only valid for devices that have a built-in camera. A custom script can be selected to further parse the scanned in bar code. Refer to 'Creating custom scripts' for more info.
Trigger: If the check sheet has checks defined as triggers, you can choose a trigger check item that will cause this check to be taken. Used primarily to pull data from an external datasource such as a plc.
Check Item Settings - Calculator
When a Check Item is of type 'Calculated', you can apply a mathematical formula or a custom python script to any number of check item values in the check sheet.
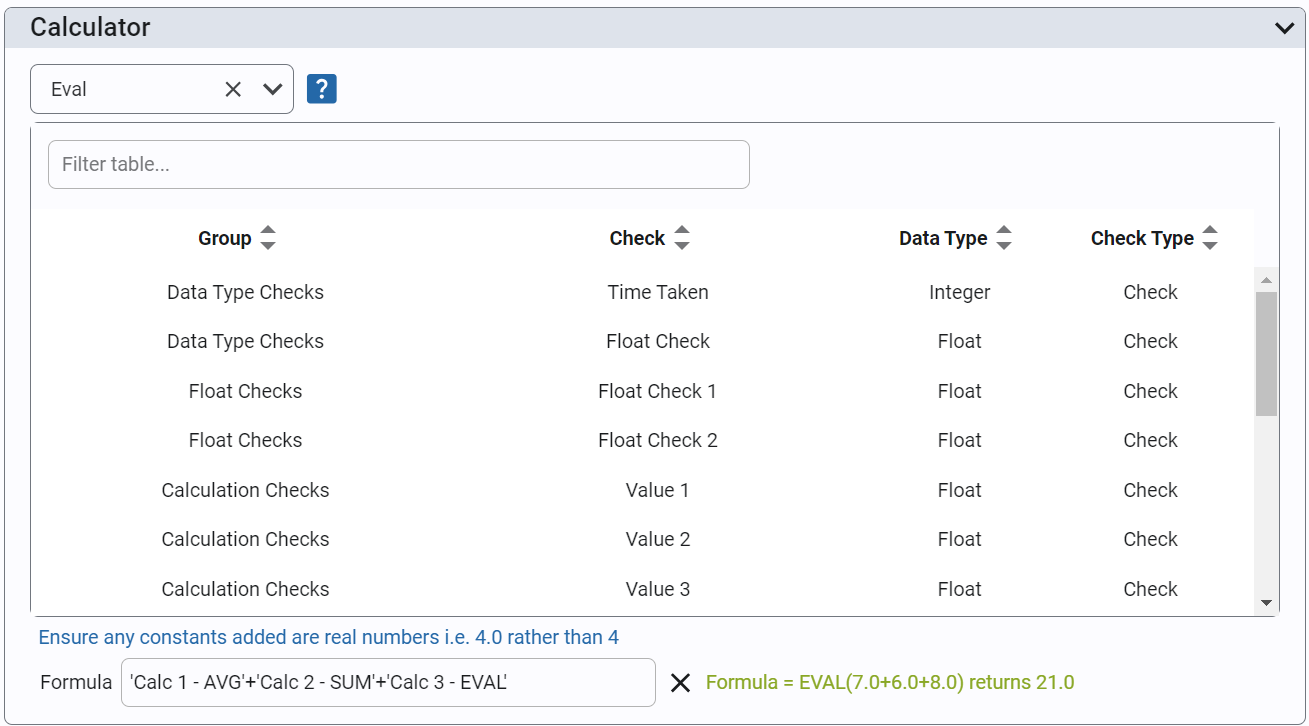
Aggregates
Select Average, Sum, Range, Min, Max or Standard Deviation from the drop down and then select check items from the table to calculate the aggregated value. Note only check items with a numeric data type are shown in the table.
Eval
Selecting 'Eval' allows check item values to be included into a formula. This option implements the python eval() function allowing formulas such as ('Check Item 1' + 'Check Item 2') / ('Check Item 3' See python eval function for help on this.
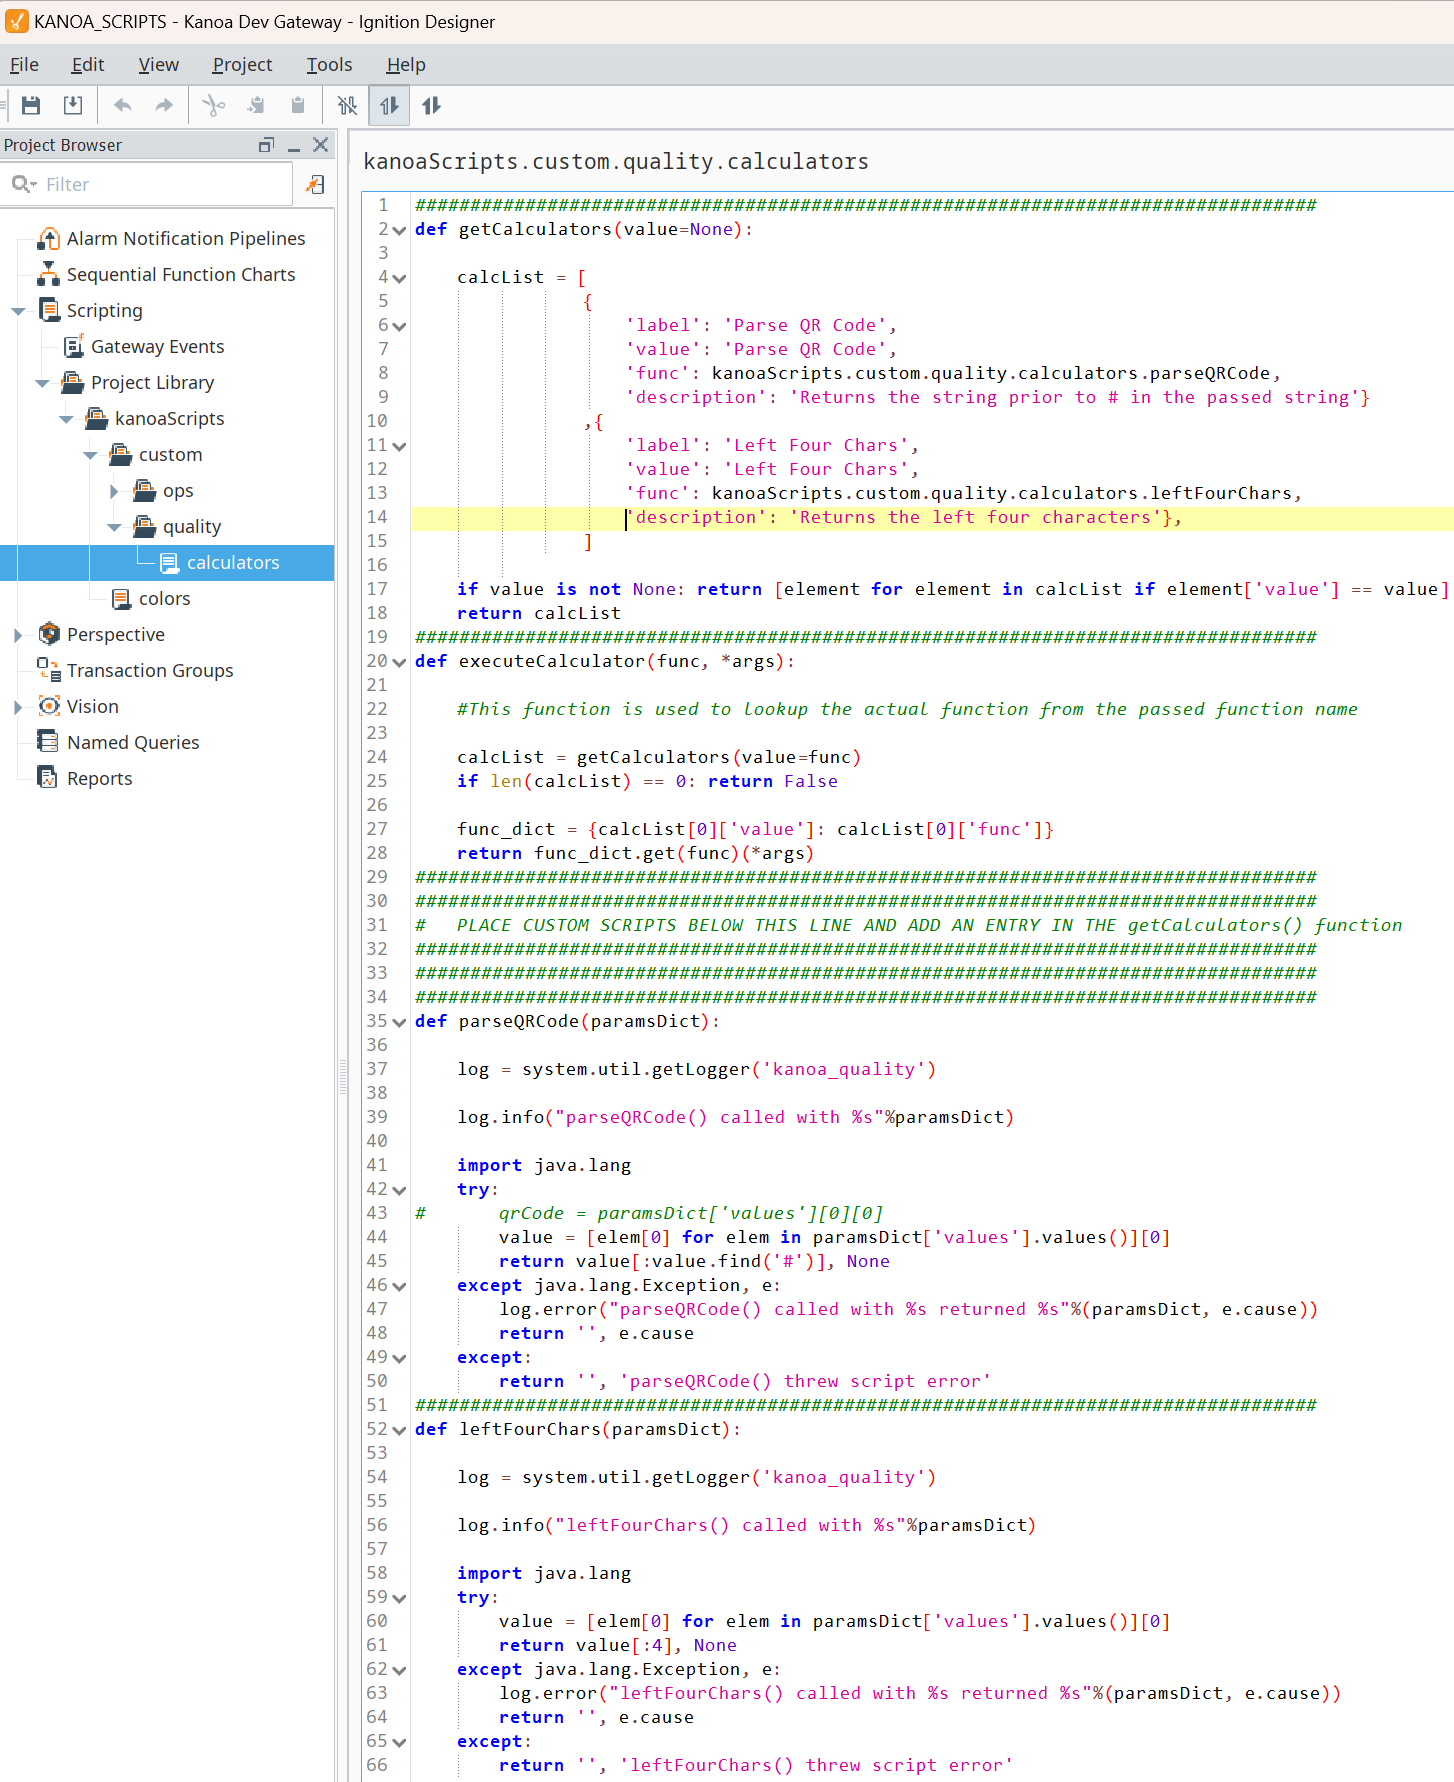
Custom Scripts
Custom scripts can be written in python unleashing the power of python and Ignition to perform any type of calculation desired.
Select the script option and then select the script you want to run against the selected check items.
Custom scripts can be created in the KANOA_SCRIPTS project. Simply create your function and add any entry in the calcList of the getCalculators() function.
The paramsDict parameter passed to the custom function passes a dictionary containing the chkItemName and list of measurement values for that chkItem.
paramsDict = {'values': {'QR Scan': ['PIC3012017182#2237918#24011503']
The return value from you custom script must be a tuple containing the returned value and a string message. Return None for a successfully executed script. Return a string to display an error to the user.
example return 'Hello World', None or '', 'An error occurred'
Testing Your Calculated CheckItem.
Dummy values are entered for check item values to verify correct syntax for calculations.

Check Sheet Triggers
The trigger tab allows you to define what should trigger a check sheet. Check Sheets can be scheduled manually without a trigger, but if you want a set of checks to be performed whenever shift changes, or when a new product starts running on a line or after maintenance has been completed, all these scenarios can be supported by adding one or more triggers.

Click the + button to add a new trigger or ![]() to edit an existing trigger.
to edit an existing trigger.
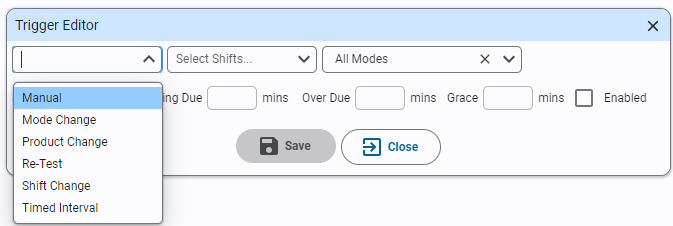
Trigger Types
- Manual: A check sheet can be manually created without this trigger, however if manual trigger is created, it will specify how much time a user has to take the checks once it has been scheduled.
- Mode Change: When the mode changes on an asset i.e. from Changeover to Production, this trigger will schedule a check sheet if it meets the specified mode/shift, other options.
- Product Change: When the product changes on an asset, this check sheet will be scheduled if the currently running product is specified by the check sheet.
- Every Product: Quality check is required every time the product changes
- Unique Products Per Shift: Quality check is required only once per product per shift
- Once Per Shift: Only one quality check will be performed per shift
- Re-Test: Set the delay, coming due etc. when a check sheet is scheduled due to a re-tst being required.
- Shift Change: Check sheet will be scheduled if the current shift meets the shift settings of this trigger.
- Timed Interval: This check sheet will be triggered periodically based on the mode and shift settings.
Note If a trigger causes a new check sheet to be scheduled when there is already an existing check sheet scheduled, it will set the current check sheet to aborted if it has not already been started and create the new check sheet.
Timers
- Delay: Delay in minutes between a trigger executing and the check sheet being scheduled. Primarily used on shift change to give shift personnel a chance to drink their tea before being bombarded with checks to be performed.
- Coming Due: Once a check sheet is scheduled, indicates to a user how long they have in minutes before this check will become due.
- Over Due: Provides amount of time in minutes a user has to start performing the checks once it becomes due.
- Grace: Number of minutes a check sheet will remain over due before its status is set to 'Missed'.