Asset Operations Screen
The Asset Operation page is the main working page for specific lines or cells. From it you view the asset's current status, control what is running, access run control, view counts, navigate to Run Review, and open dashboards and charts for that asset.
Reference Materials: Asset Operation Screen.
Watch Starting Production Tutorial
A ready-built Operator Station screen is provided where operators can select orders, view the schedule, execute operations and update production counts, or code downtime events. And it's entirely customizable!
The Asset Operation screen allows an operator to manage the day-to-day operations for an asset. This can be navigated to by clicking on an asset from the Asset Overview dashboard or by selecting Ops\Operations\Asset Operation from the navigation menu.
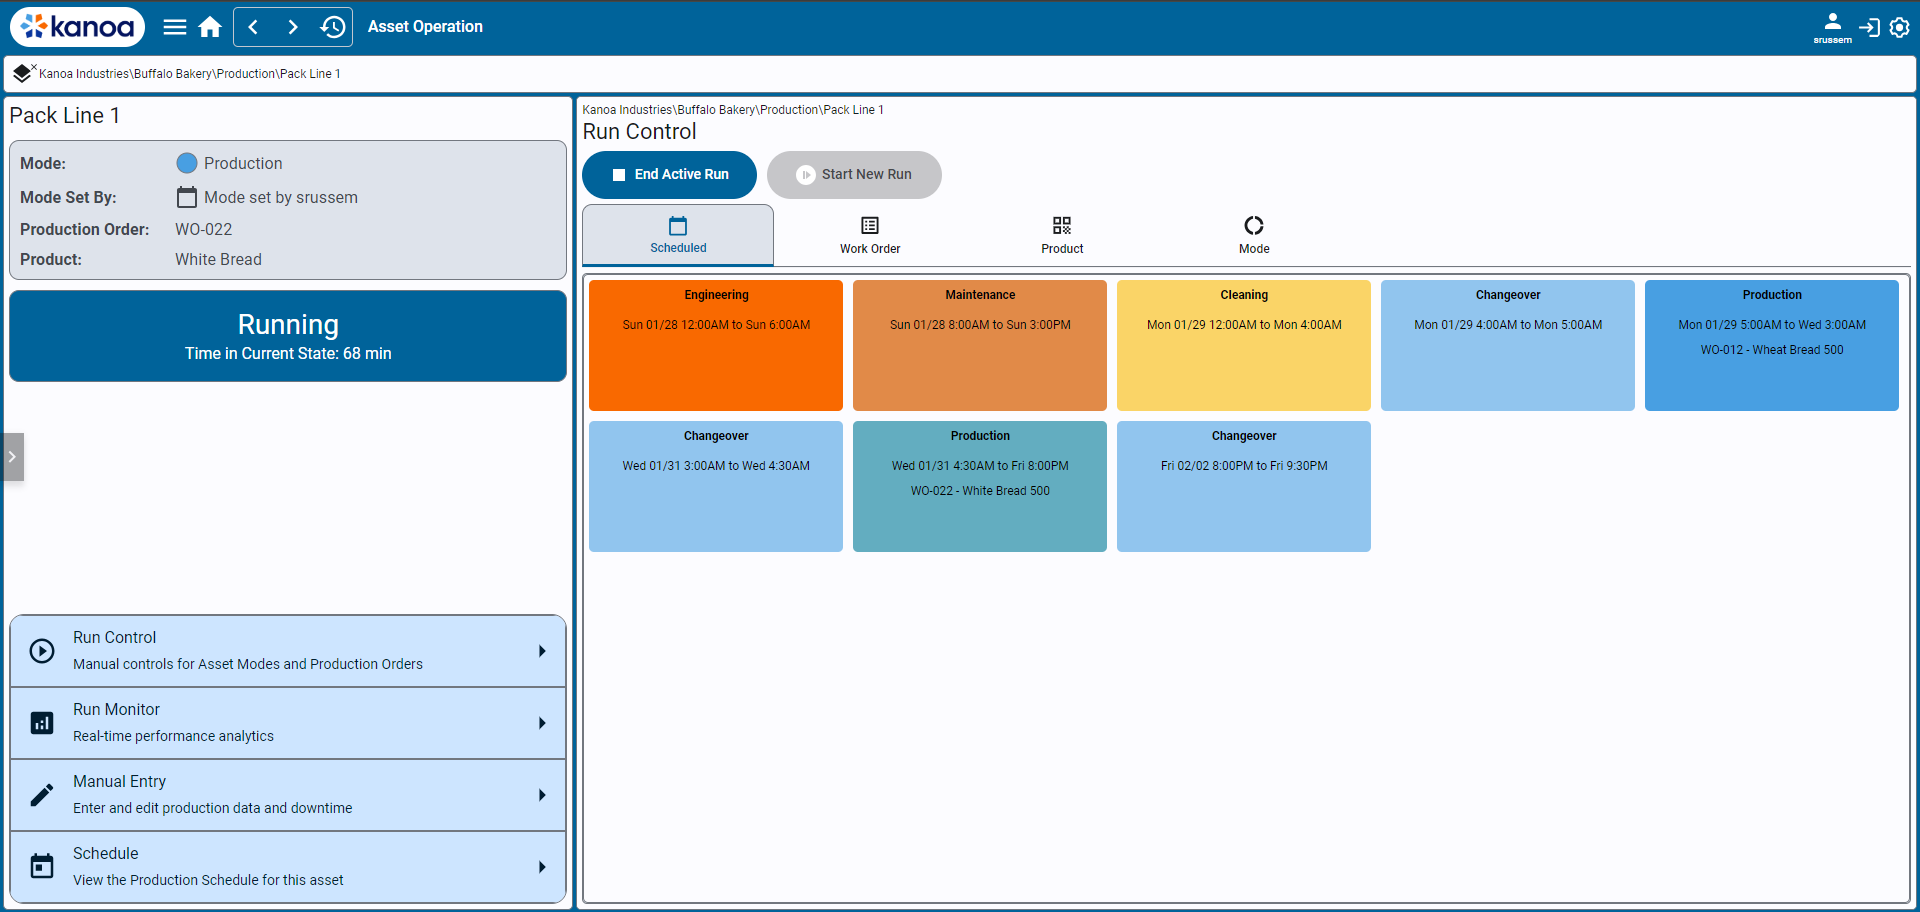
From this screen, an operator can...
Start and End Runs (Run Control)
- Select production orders and start and end production runs
- Start and end non production order runs
- Select a scheduled event
- Change the mode of an asset to 'idle', 'maintenance', 'changeover', or any other defined mode associated with the asset.
View Current Production Run KPIs (Run Monitor)
- View production KPIs for the current run, last 24 hours, last 7 days, or last 14 days.
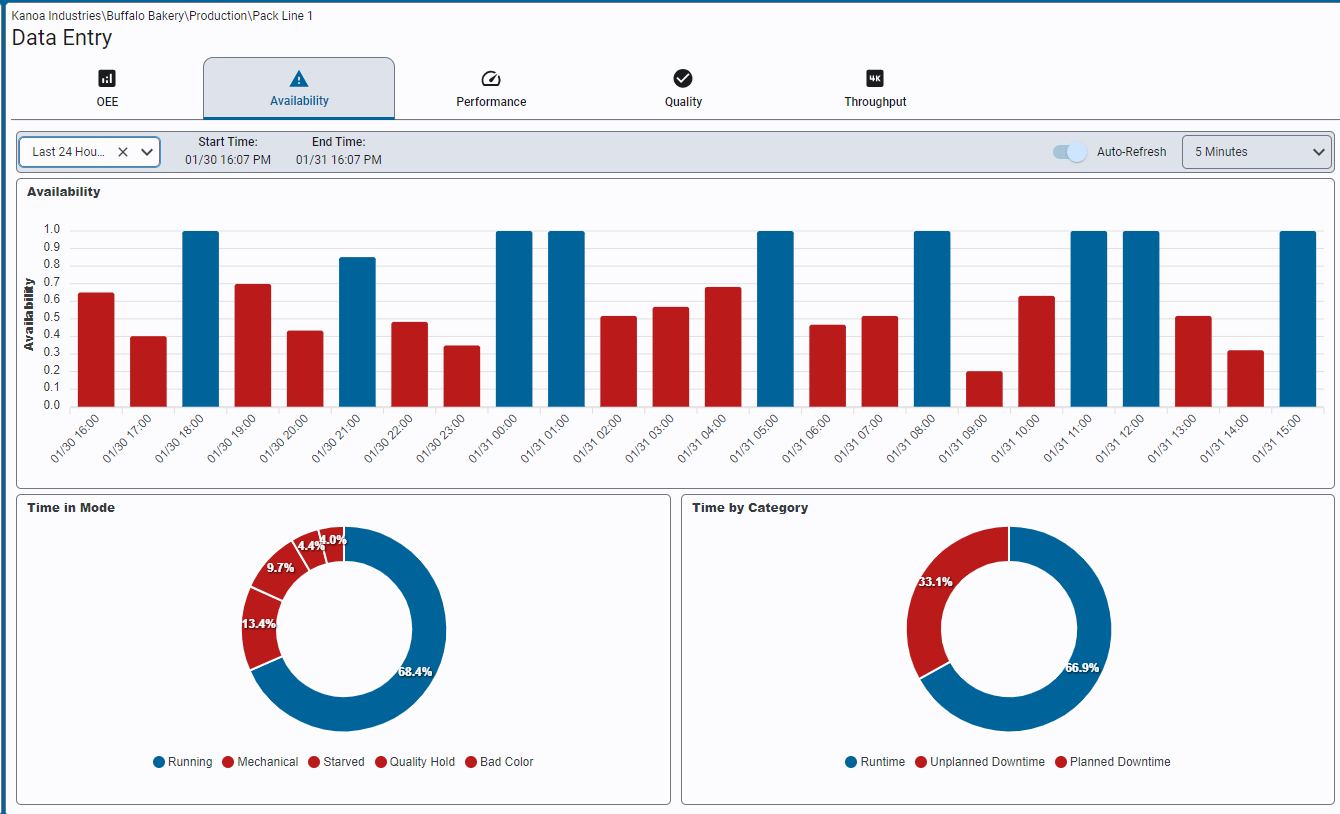
Edit Production Run Downtime and Counts (Manual Entry)
- Add, edit and delete asset states and downtime events
- Correct production counts
- Create and consume production lots from production runs
View Asset Schedule (Schedule)
- View schedule and add or edit schedule events.
Editing Production Counts
It is essential for operators to accurately manage and revise production run data. The functionality to edit counts and downtime ensures that the production data reflects the actual performance and events on the production floor. This screen is instrumental in maintaining the integrity of production data, which is crucial for effective operational analysis and decision-making.
Users can edit production counts by selecting a production run from the Run Review tab on the Manual Entry screen.
Infeed, outfeed, and waste counts can be edited by entering a new value in the numfield and clicking on the save button. A calculator symbol next to a count indicates that no counts were recorded from the PLC for that count and so the count has been calculated from the other two counts. Adding a count to a calculated count will change it so that it is no longer calculated. It is your responsibility to ensure that counts match up i.e. infeed = outfeed + waste. You can clear a count by using the X next to it and this will cause it to be re-calculated.
Downtime Event Editor
Anytime the state of an asset changes, a record is created in the mes.stateEvent table. State can be of type 'running', 'unplanned downtime,' or 'planned downtime'.
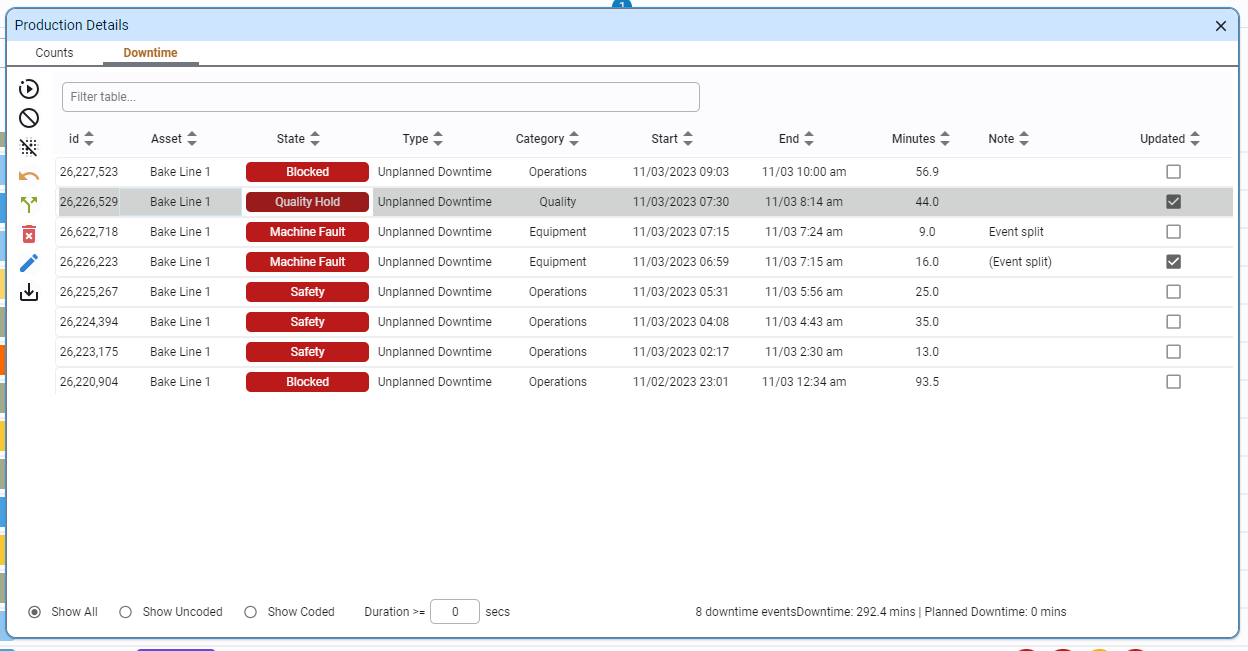 The Downtime Editor allows the following actions:
- Edit a state / downtime event
- Add a state
- Delete a state
- Split a state
- Revert a state
Editing Asset States / Downtime Events
- Select a downtime event and click the
 .
. - Select the cell that was responsible for the downtime or leave it at the asset (line) level.
- Click on the to select the new state.
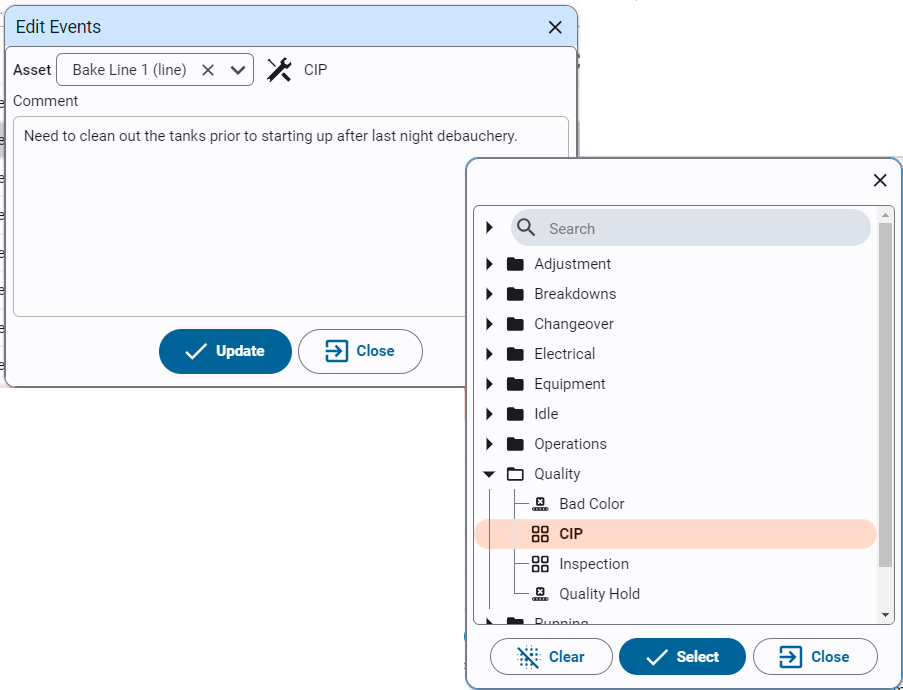
- Updated downtime events are marked with a checkbox.
Note
- Downtime events can be deleted in which case the previous state will include the period of time of the deleted event.
- Downtime events can also be split into multiple events. You can specify the duration for the split and re-code each event as necessary.
- Split events and updated events can be reverted. Deleted events cannot.
Customizing the Operator Station
We have provided hooks in the Operator Station that allow you to customize the screens displayed to the user.
Asset Custom Properties
Reserved asset custom properties can be set in the asset configuration screen which allow custom screens to be displayed. See Configure Assets.
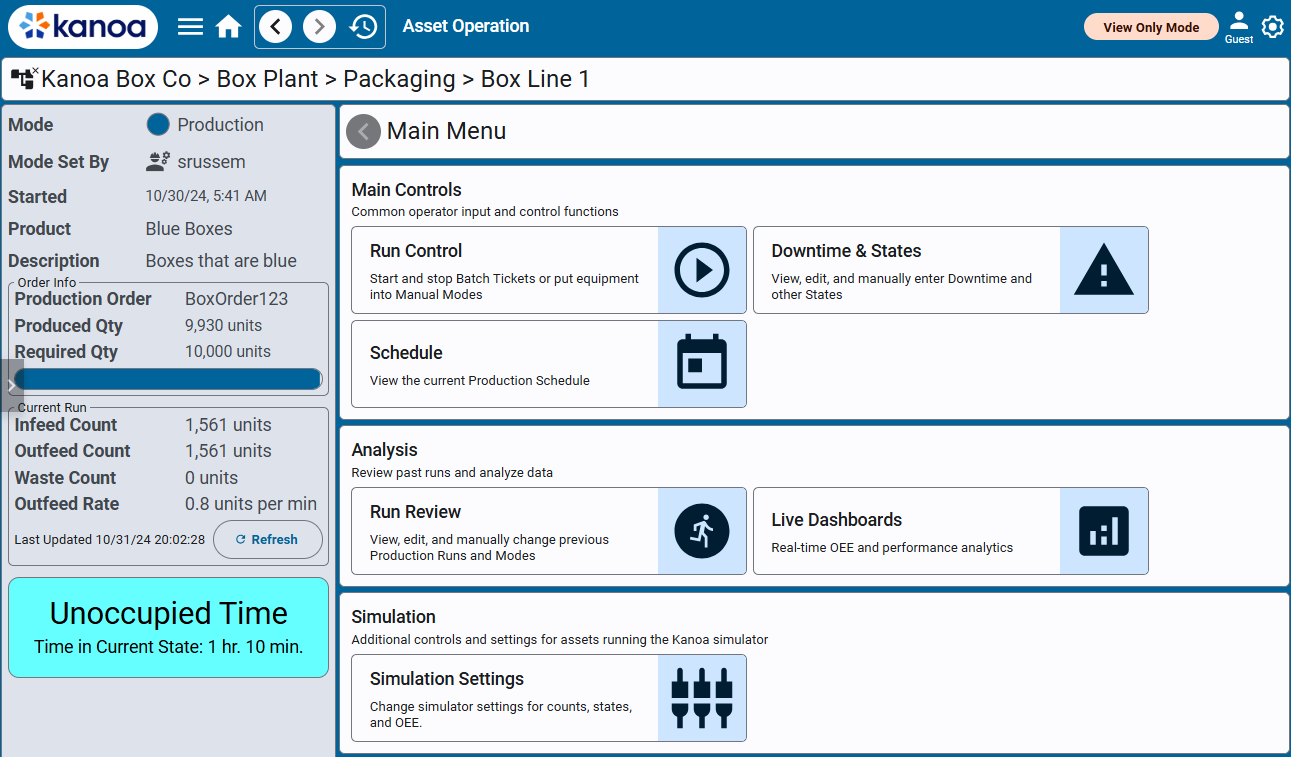
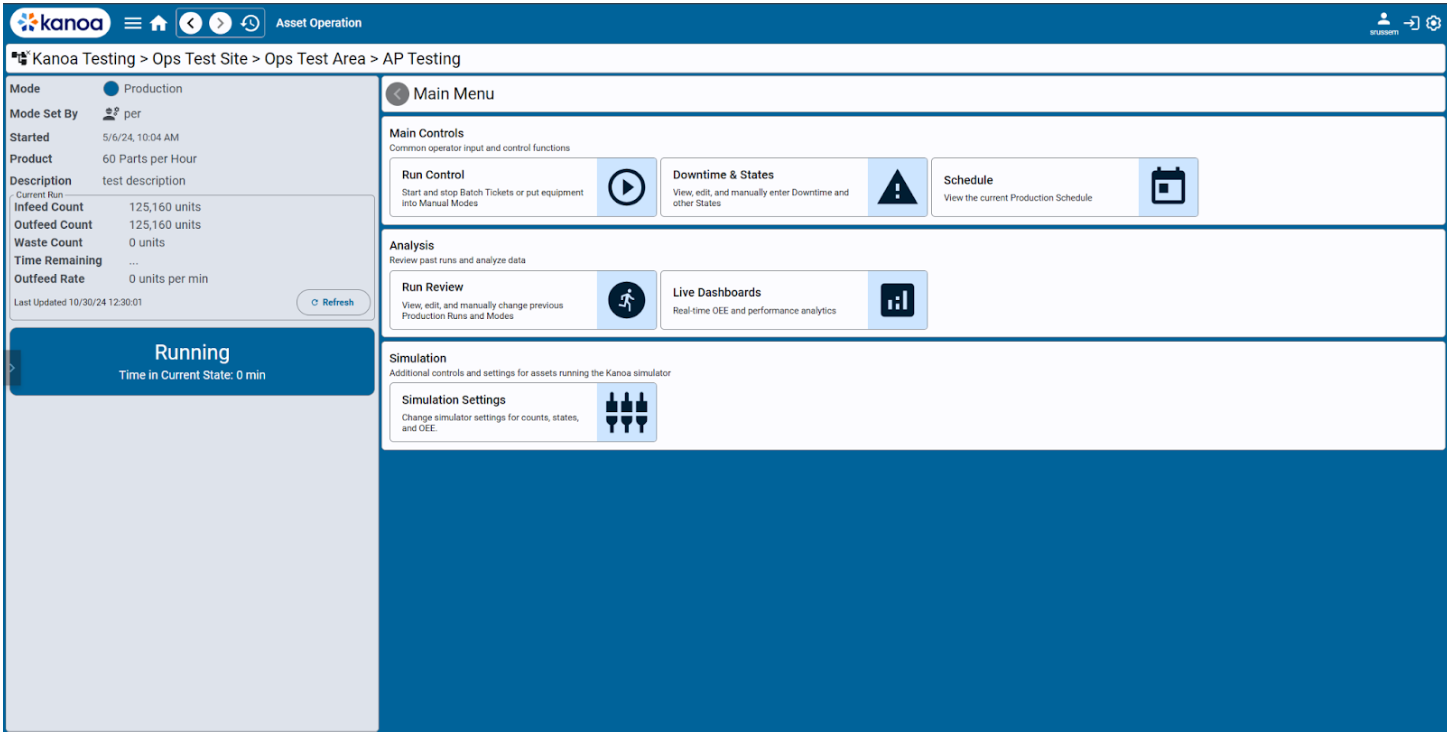
For example, the screenshot below uses the _assetOpsViewPath 'kanoa/mes/asset/operation/simulatedAssetNav'.
_assetOpsViewPath
Add this custom property to specify a new view for the Asset Operation screen navigation page. The default view path is 'kanoa/mes/asset/operation/defaultNav'.
For example, the screenshot below uses the _assetOpsViewPath 'kanoa/mes/asset/operation/simulatedAssetNav'.
_runSetupViewPath
The runSetupViewPath is used to display a pop-up requiring user input before starting a production run, instead of starting it automatically. This view is ideal for adding dynamic attributes, custom properties, confirmation prompts, or other information operators must review before beginning a production run. The pop-up appears when a user clicks the button to start a production run on a specified asset. There is no 'default screen' associated with this function, and production runs will start without any additional input from the user.
Note that the pop-up is responsible for calling the Kanoa system.kanoa.event.assetOperationChange function to change the asset's mode.
_productionReportViewPath
Add this custom property to an asset to specify a new view for that Asset's Production Report. The default view path is 'kanoa/mes/analytics/productionReport'.
For example, the screenshot below uses the _productionReportViewPath 'kanoa/mes/demos/customProductionReport'.
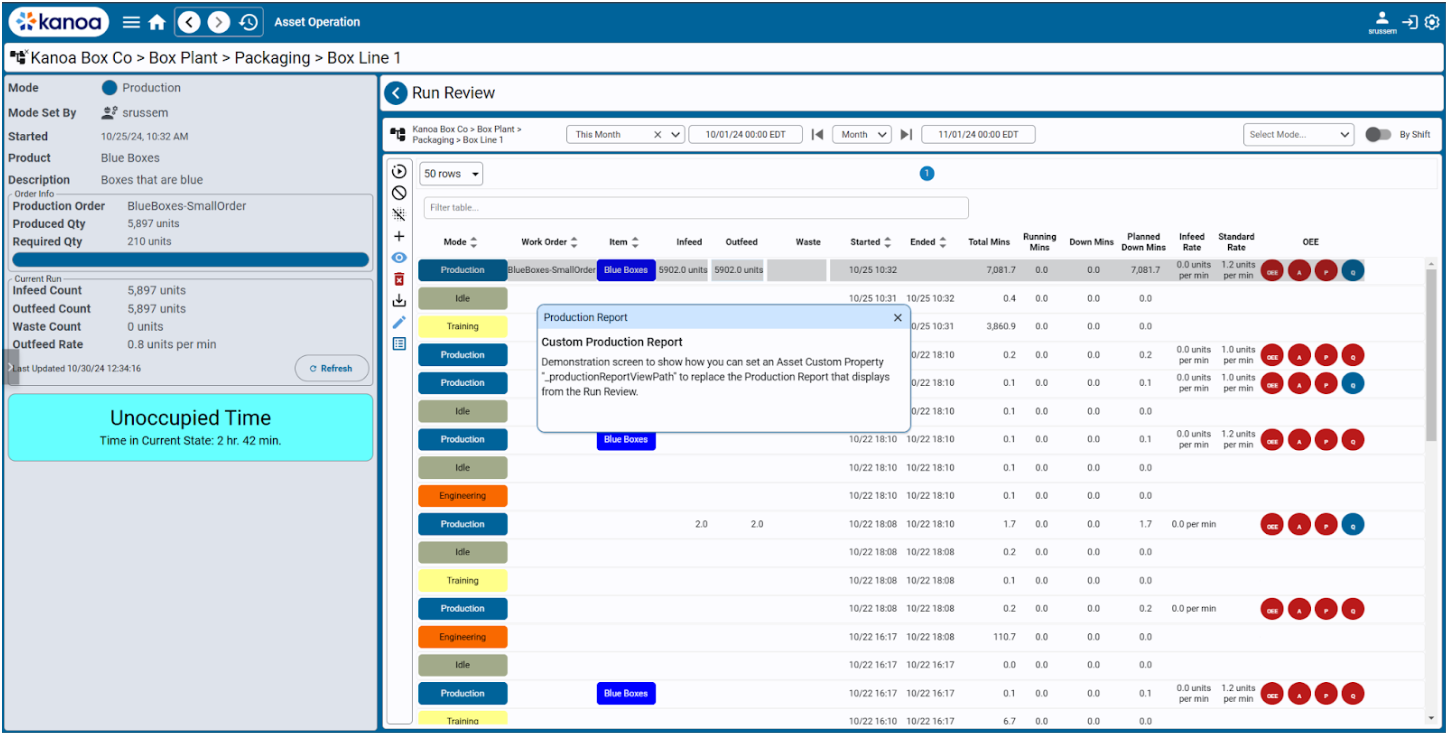
Note that the Production Report pop-up button that is affected by this custom property is accessed through the Run Review for production runs that have an associated production order.
You'll now customize the Asset Operation page for Manual Pack 1. You'll move and hide navigation items, see where security applies, and change the default dashboard.
Different assets need different screen layouts. A highly automated line may need dashboards and charts; a manual line may need more screen space for operator entry; a manager may need Run Review; an operator may only need the basic operation controls.
- Navigate to Configuration → Ops → Assets, select Manual Pack 1, and open the far-right configuration tab, Asset Operation.
The page has three main sections:
- Asset Operation Screen Controls — the overall screen configuration.
- Navigation Items — which navigation options appear, and where.
- Preview — what the Asset Operation page will look like after configuration.
- Move navigation to the left panel. Changing the navigation layout from the default position to Left Panel moves navigation to the left side of the screen and frees space in the main dashboard/content area — useful for manual assets where operators need more room to interact with the screen.
- Turn off unused navigation items. For Manual Pack 1, disable items that aren't needed, such as Live Dashboards, Run Charts, and the Orders page. This reduces clutter and keeps the operator experience aligned with how the asset is actually used.
Each navigation item can be associated with a security function, so access follows user permissions — for example, operators see basic operation controls, managers access Run Review, and engineers access charts or diagnostics.
- Open the Asset Operation screen for
Manual Pack 1and click the Dashboard icon. - Select Operator Dashboards → Operator Station Full.
- Set it as the Default for this asset, as you did for
Machine 1in Start A Production Run.