Custom Lot Screens
tracePerspectiveViews.zip: two Perspective views, training/receiveLot and training/transferLot.
- In Ignition Designer, import
tracePerspectiveViews.zipinto thekanoaMESproject and save. The views appear undertraining. - Navigate to Configuration → Application → Navigation. Add a
Tracemenu item with two children:Receive Lot, opening the viewtraining/receiveLot, andTransfer Lot, openingtraining/transferLot.
Reference Materials: Navigation
The navigation options available to a user can be modified through the application in the navigation configuration screen. This provides the ability to weave your custom screens in alongside the provided kanoa screens, to create a seamless application.
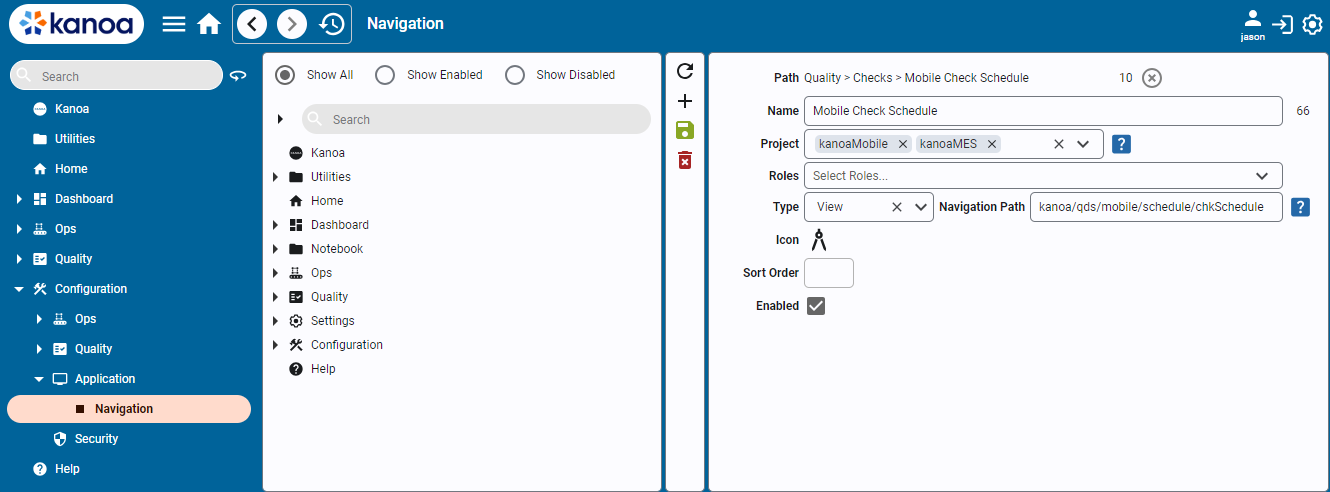
To create a new navigation item under an existing one, click anywhere in the navigation tree and select the  button.
To create a new item at the root level, simply click the
button.
To create a new item at the root level, simply click the  button without selecting a parent.
- Path: Informational. Displays the path and parentId. The parent can be cleared to place the navigation item at the root.
- Name: Add a name for the menu item that will be shown in the navigation tree.
- Project: Specify one or more runnable projects for which the item will appear. Leave blank to make it available to all projects.
- Roles: Add specific user roles required for the menu item to be visible.
- Type: Link the item to a view or page created in the Designer, or to a URL.
- Icon: Add a custom icon for this item.
- Sort Order: Define the order in which the item appears in the tree.
- Enabled: Enable or disable the item to show or hide it from the navigation.
Click the  to save your changes before doing any other edits.
Click the  to delete a navigation item.
Navigation items can be rearranged by dragging them to different positions in the tree.
- Open Receive Lot. Choose a raw material, enter a quantity and unit, and click Receive.
- Confirm the new lot appears in Lot Manager at
Storage\Receiving. - Open Transfer Lot. Choose
Storage\Receivingas the source, select the lot you just received, chooseStorage\Binsas the destination, enter a quantity, and click Transfer. - Confirm both "Lots at" tables update, and check the transfer in Lot Manager.
How the screens work:
- Receive Lot always receives into
Storage\Receivingand only listsCoreForge\RMitems. It picks theRaw Blending Ingredientsserialization for coating items andRaw Aluminumfor everything else, creates the lot, then runs aReceiveoperation with one output. - Transfer Lot fills both tables with
getLotActivity, then runs aTransferwith the selected lot as the input at the source and the output at the destination. It also shows the lot's trace graph.
These screens hard-code CoreForge's items, serialization names and receiving area. The transfer screen only rejects quantities of zero or less; it doesn't check the quantity against what's available. Treat them as examples to copy from, and add that validation in your own screens.