Item Sets and Attribute Tolerances
All nine machined parts are in one item class, CoreForge\WIP\Machined, but they belong to three families with different specs. An item set groups items when the item classes don't match the grouping you need. Each item can belong to only one item set.
- Navigate to Configuration → Ops → Materials and confirm
CoreForge\WIP\MachinedcontainsCP-,PR-andSC-items in 2024, 6061 and 7075. If not, importitems-coreforge-wip-machined.json. - Navigate to Configuration → Quality → Item Sets and open the item set editor.
- Create three enabled item sets:
Coupling Pins,Precision RodsandShaft Cores. - Link
CP-2024,CP-6061andCP-7075toCoupling Pins, thePR-items toPrecision Rods, and theSC-items toShaft Cores.
Reference Materials: Item Sets
Product (Items) are naturally grouped in Item Classes. However it is possible that you may want to group a set of items that are in different classes when configuring check sheets that should only be enabled for a certain grouping of products. Item Sets can also be used to group together items that share a common set of tolerance specifications and the ability to do this really simplifies the management of tolerances rather than having to specify the same tolerances for every product you have.
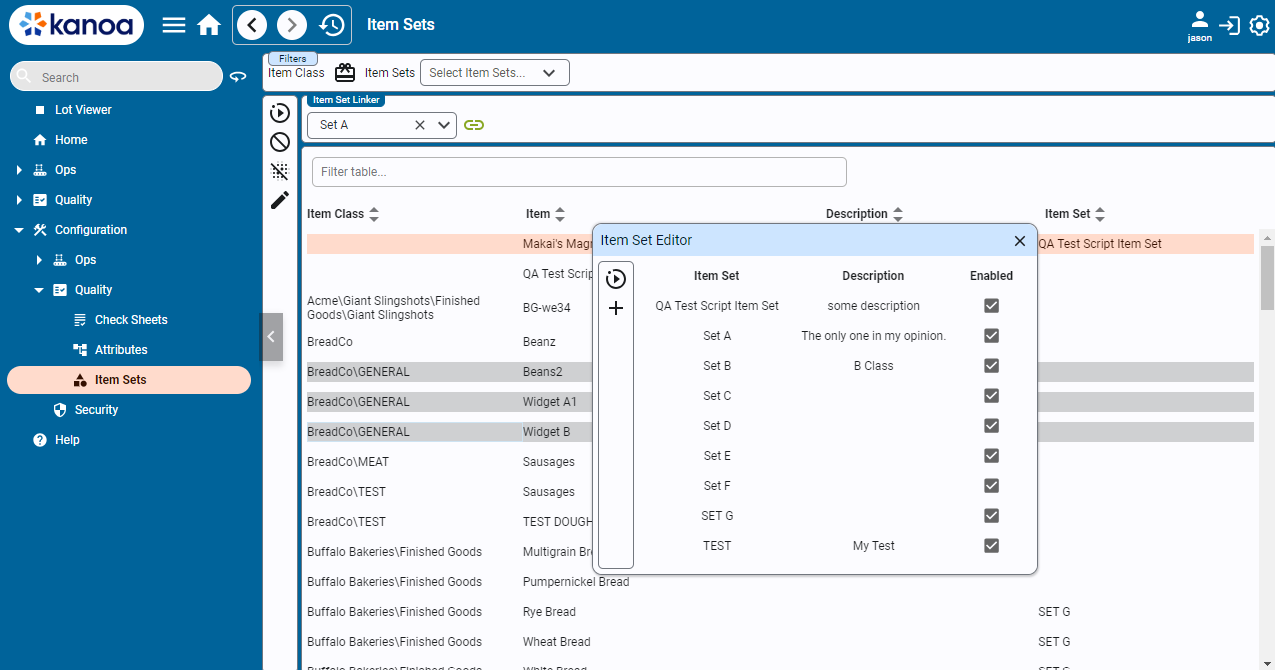
Use the  to open up the Item Set Editor. you can add, edit and delete Item sets here.
Select any number of items and press the  to link these items together.
Note An item can only belong to one item set at a time, ensuring clarity in determining which tolerances apply.
An attribute is a named quality variable, such as a diameter, that check items can refer to. Its tolerances can be set per asset, item, item set, or for all items, so the check item doesn't need a hard-coded spec.
-
Navigate to Configuration → Quality → Attributes and create the folders
CoreForgeandMachining, then an attributeFAI Diameterinside them. -
On its Tolerance tab, add one tolerance for each item set (all values in mm):
Item set LEL LSL LCL Target UCL USL UEL Coupling Pins9.85 9.90 9.95 10.00 10.05 10.10 10.15 Precision Rods14.80 14.88 14.94 15.00 15.06 15.12 15.20 Shaft Cores24.70 24.82 24.91 25.00 25.09 25.18 25.30 -
Make sure each tolerance is enabled, and save.
A value between the control and spec limits passes but is highlighted as a warning. A value outside the spec limits (LSL/USL) fails. A value outside the entry limits (LEL/UEL) can't be entered.
Reference Materials: Attribute Tolerances
Tolerances
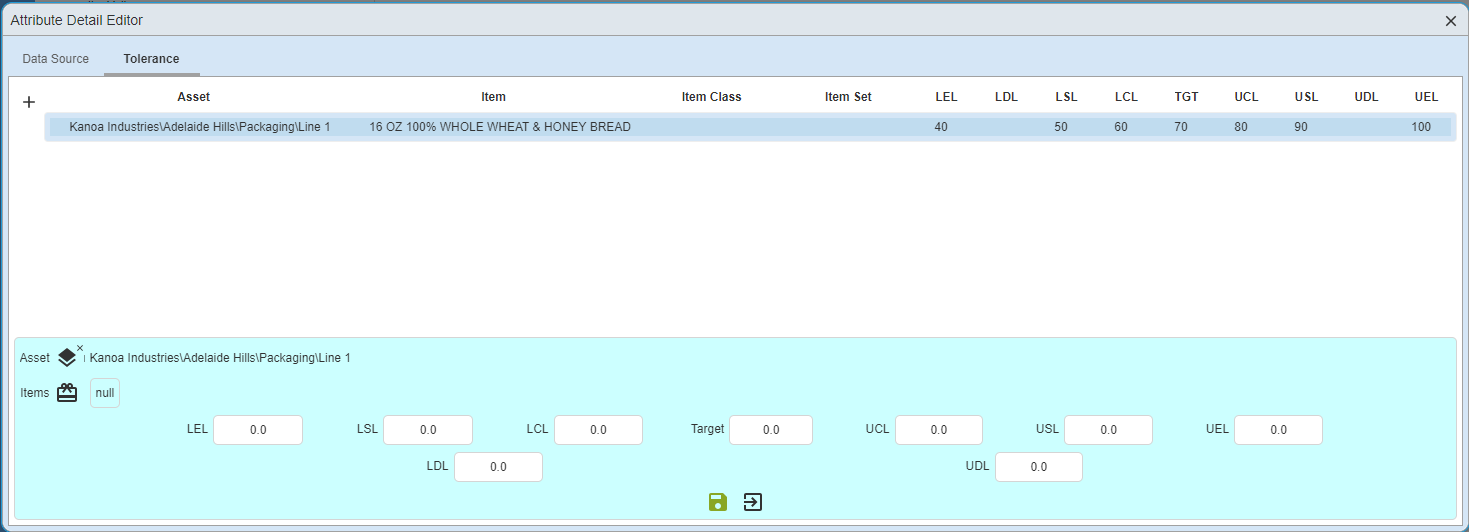
One or more specifications (or tolerances) can be added to an attribute. A tolerance can be applied to all items by leaving the Asset, Item and Item Set fields blank. Otherwise, the Asset and Item selectors can be used to set tolerances by individual item, asset or item set. To add a new tolerance, click the
Add Tolerance button on the left of the Tolerance tab.When a check is to be taken, it will first check if a tolerance exists for the current item. If no tolerance is found, it will check if the current item belongs to an item set that has a tolerance. If no item set tolerance has been configured, it will use the tolerance defined for all items.
Tolerance Parameters
- LEL Lower Entry Limit: Defines the minimum value that can be entered.
- LSL Lower Spec Limit: Defines the lower Pass / Fail condition. Failing values will be highlighted red.
- LCL Lower Control Limit: Defines the lower limit condition. Values below the LCL will be considered as passing but will be highlighted orange.
- Target: Defines the expected ideal value
- UCL Upper Control Limit: Defines the upper limit condition. Values exceeding the UCL will be considered as passing but will be highlighted orange.
- USL - Upper Spec Limit: Defines the upper Pass / Fail condition. Failing values will be highlighted red.
- UEL - Upper Entry Limit: Defines the maximum value that can be entered.
Tolerance parameter values must make logical sense or will be highlighted in red as a warning. For instance, the Upper Entry Limit cannot be smaller than the Lower Entry Limit.