Complete a Check Sheet
A routine check, such as a cleanliness check, is a check sheet with a short list of questions. Each question is a check item. Each time someone fills in a check sheet, Kanoa records one check event. This lesson shows you how to find or add a check, fill it in on a desktop or mobile device, and submit it.
The Operator track covers the same job from the Operator Station. See Complete a Quality Check for finding a check from the Notifications card. This lesson covers the quality screens.
Find a Scheduled Check
Kanoa schedules check sheets for you, based on triggers such as a production run, a mode change or a shift change. Open them from the Check Table or the Active Checks screen.


- Open Quality → Schedule → Active Checks or Quality → Schedule → Check Table.
- Double-click a scheduled check, or select it and click the Edit button, to open it for entering data.
A check that hasn't been started moves through these statuses on its own: Coming Due, Due, Over Due and Missed. A check that is Missed was not started in time, and shows on compliance reports.
Add a Check Yourself
You can also start a check that nothing has scheduled, such as a routine cleanliness check.
- Click Add Check.
- If the check sheet needs an asset and an item, Kanoa asks which asset and which item you're checking. Choose them.
- Open the new check.

A check you add by hand is Due as soon as you add it. The Add Check list shows only released, enabled check sheets. It leaves out Auto check sheets, whose values are captured from tags. Tick Include Auto Checks if you need one.
Fill In the Check

- Enter a value for the selected check. For a pick list, such as Clean / Dirty, tap the button. For a number, use the keypad.
- After each value, the next check is selected for you.
- Use the clear icon to remove a value you entered by mistake.
- Click the blue i icon on a check to read its instructions.
- Add a comment to a single check item if it needs one, or a general comment for the whole check sheet.
A progress bar at the top shows how much you've done. A check is white or empty until you enter it. After that its color shows whether it is good or bad against its limits. It is gray if the check has no limits.
Check entry is by pop-up value entry or by keyboard. Click the keypad icon at the upper right to switch between them.
Submit the Check
- If any check failed (red background), add a comment. A check sheet with a failure can't be submitted without one.
- Submit the check sheet.
Each check sheet decides whether it needs a sign-off. If it doesn't, a submitted check goes straight to Approved. If it does, it waits as Submitted until someone with the Approve Checks function approves it.
You can cancel a check at any time before you submit it.
Entering checks needs the Enter Checks security function.
Complete a Check on Mobile
The same checks work on a phone or tablet.
- Open Mobile Check Schedule from the left menu.
- To add a check, click the add icon (+) at the upper left. Select an asset and an item, then click Add.
- Open the check and fill it in as you would on a desktop.
On mobile you can also take a photo or video with a check, and record where the check was entered on a map using GPS.
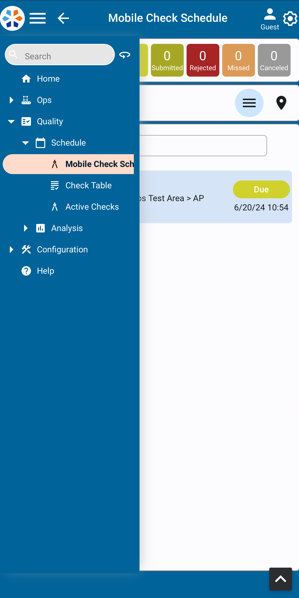
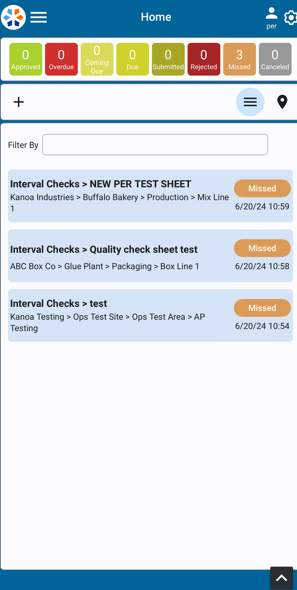
Reference Materials: Enter Check Data - Entry controls, colors, comments and mobile options.
Enter Check data
All check input fields will be displayed as defined by the check sheet. If Check Groups are used - they will display above the checks themselves. Check entry can be toggled between a Value Entry Popup window or keyboard input by clicking the
in the upper-right corner. There is also a selection for touch screen entry for devices with the ability.
After a check has been entered, the next check is automatically selected; after the last check in a group, the selection stays on it rather than going back to the top. If there are multiple measurement counts, the direction in which the next check is selected can be changed by clicking the
icon . A check entry can be cleared by using the icon.If a pick list has been defined for a check item, pick list buttons are displayed for the user to enter the check value. If no picklist is defined for a numeric check, the numeric keypad is displayed. The numeric keypad can also be used instead of the picklist buttons by clicking .
A value outside a check's entry limits is refused with a message that gives the allowed range, and nothing is saved; enter a value within it. A value within the entry limits but outside the check's specification is saved and shown as failed.
Comments can be added for individual check items or a general comment for the check sheet can be added. If any check fails (as indicated by a red background), a comment will be required when the check sheet is submitted.
Above the Check Groups - to the right, the Spec Checks will be displayed with a graphical display of limits and actuals
A progress bar at the top tracks completion. Color coding indicates the status of each check (white/empty for incomplete, color-coded for complete with good/bad thresholds, gray for complete without thresholds).
Click the blue i icon and a dialog box will open with the information for each check as defined in the Check Sheet.
At any time during check entry, Check Sheet can be canceled. Once the checks are all entered, the check sheet can be submitted for approval and then accepted or rejected.
Checks can also be entered using your mobile device. On mobile, additional options include GPS tracking with a map view to record where checks were entered, as well as the ability to take photos or videos.
Controls
- Close Button: Located in the upper left, used to exit the check.
- Check Name: Displays the name of the check.
- Asset Information: Shows the assigned asset and current status of the check (e.g., due, coming due).
- Estimated Time to Complete: Indicates the time required to complete the check.
- Mode Indicator: Displays whether the check is in edit mode (for completing the check) or view mode (for reviewing entered data).
- Timestamp: Shows the current timestamp associated with the check.
- Edit Item Classes Button: For associating items to the check, if applicable.
- Toggle Keypad/Button Size: Switches between touchscreen and keyboard-friendly interfaces.
- Navigation Controls: Includes buttons for navigating between check entries and a clear button to reset check values.
- Information Button: Provides additional instructions for the check sheet.
Check Your Understanding
- A check sheet is Missed. What does that mean?
- You enter a value that makes a check turn red. What must you do before you can submit?
- Where do you open the checks on a phone?
Answers
- It wasn't started before its Over Due and Grace time ran out.
- Add a comment. A check sheet with a failed check can't be submitted without one.
- Mobile Check Schedule, from the left menu.