Measure Against Tolerances
Many checks are measurements: a diameter, a length, a weight, a temperature. Kanoa judges each value against the limits set for the item being made, so the same check can be used for many products. Your Quality Manager builds these checks and sets their limits, so the check sheets you use will have their own names and measurements. This lesson uses the Machining - First Article Inspection, if it has been created: the Quality Manager track builds it in Build a First Article Inspection. Any other measurement check works the same way.
Open the Check
Measurement checks are often scheduled for you, for example when a machine starts a run, at a shift change, or every so often. When one is coming due or due, the Notifications card on the machine's Operator Station counts it. Tap the card, then tap the check. You can also find it on Quality → Schedule → Active Checks or Check Table.
- Open the check.
- Confirm the asset and the item are filled in. The item decides which limits apply.
The check is scheduled when a machine enters Production, so the first part of each run is measured. The machines make coupling pins (10 mm diameter), precision rods (15 mm) and shaft cores (25 mm). Each part family has its own diameter tolerance, so the same Diameter check item judges each one correctly.
Enter the Measurements
- Enter each reading. Some check items take more than one measurement: enter one reading in each box.
- Fill in any other items, such as a visual check.
- Submit the check.
When a check item takes more than one measurement, Kanoa keeps every reading and judges the combined result, such as their average or their largest value. The check sheet decides which.
The check has three items: Diameter (three measurements, judged on their average), Length (two measurements, judged on the largest) and Visual Defect Check.
What Happens When a Value Is Out of Spec
Each tolerance has limits. Kanoa compares every value you enter against them.
| Your value is... | What Kanoa does |
|---|---|
| Outside the entry limits | Refuses it, with a message giving the allowed range. Check your reading and enter it again. |
| Between the control limit and the spec limit | Saves it as a pass, and highlights it in orange as a warning. |
| Outside the spec limits | Saves it as failed, and highlights it in red. |
For example, Length at CoreForge has a spec of 100 to 200 mm. Readings of 150 and 205 give a largest reading of 205, so the check item fails.
After a failure:
- Add a comment saying what you found and what you did. You can't submit a check sheet with a failure without one.
- Submit the check.
- Follow your plant's procedure for a failed check.
Your plant may also set a check sheet to schedule another check straight away when a check fails, or to email a team or user. When that happens you'll see a new check on your schedule.
Read the entry limits message before you retype. It tells you the range Kanoa accepts, which is often enough to spot a misread gauge or a typing slip.
Reference Materials: Attribute Tolerances - What each limit means and how it's colored.
Tolerances
One or more specifications (or tolerances) can be added to an attribute. A tolerance can be applied to all items by leaving the Asset, Item and Item Set fields blank. Otherwise, the Asset and Item selectors can be used to set tolerances by individual item, asset or item set. To add a new tolerance, click the
Add Tolerance button on the left of the Tolerance tab.When a check is to be taken, it will first check if a tolerance exists for the current item. If no tolerance is found, it will check if the current item belongs to an item set that has a tolerance. If no item set tolerance has been configured, it will use the tolerance defined for all items.
Only enabled tolerances are used. Clear a tolerance's Enabled checkbox to stop it applying without deleting it; the next best-fit enabled tolerance is used instead. A new tolerance starts enabled, and the table's Enabled column shows each one's setting.
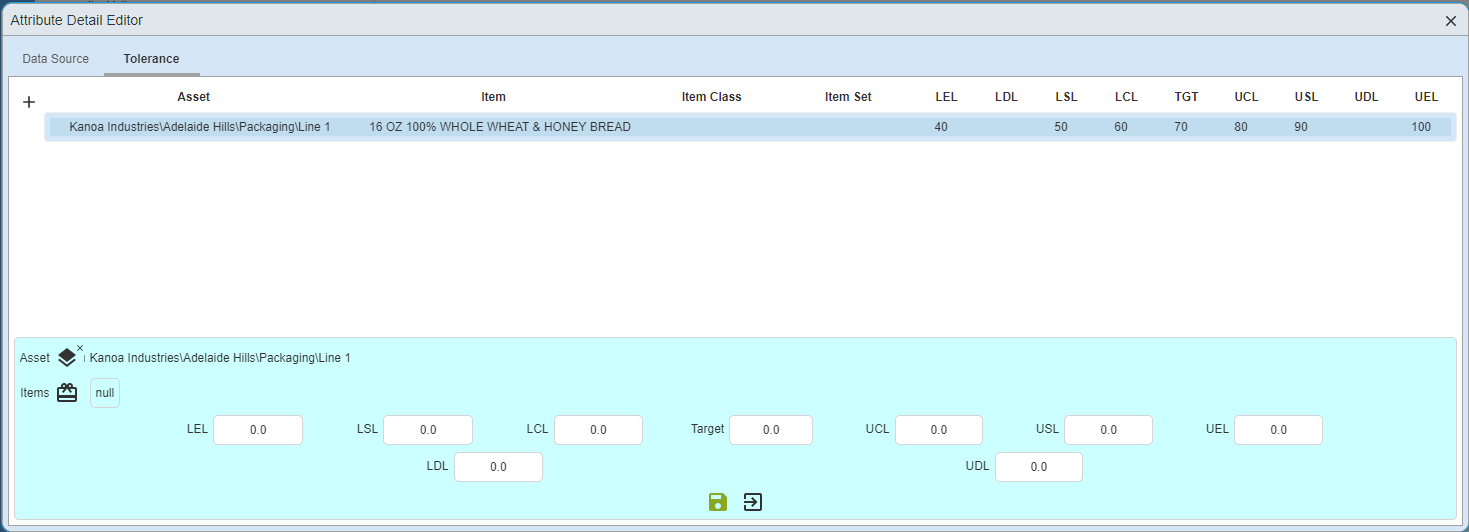
Tolerance Parameters
- LEL Lower Entry Limit: Defines the minimum value that can be entered.
- LSL Lower Spec Limit: Defines the lower Pass / Fail condition. Failing values will be highlighted red.
- LCL Lower Control Limit: Defines the lower limit condition. Values below the LCL will be considered as passing but will be highlighted orange.
- Target: Defines the expected ideal value
- UCL Upper Control Limit: Defines the upper limit condition. Values exceeding the UCL will be considered as passing but will be highlighted orange.
- USL - Upper Spec Limit: Defines the upper Pass / Fail condition. Failing values will be highlighted red.
- UEL - Upper Entry Limit: Defines the maximum value that can be entered.
Tolerance parameter values must make logical sense or will be highlighted in red as a warning. For instance, the Upper Entry Limit cannot be smaller than the Lower Entry Limit.
Check Your Understanding
- Why can one measurement check be used for many different products?
- Which value does Kanoa refuse to save?
- A reading is between the control limit and the spec limit. Does the check fail?
- What must you add before you can submit a check that has a failed item?
Answers
- Kanoa judges each value against the limits for the item being made, and the item is filled in on the check.
- A value outside the entry limits. Kanoa shows the allowed range.
- No. It passes, but it's highlighted in orange as a warning.
- A comment.