Build a First Article Inspection
A first article inspection measures the first part of a run before production carries on. It brings together most of what a measurement check needs: an asset and an item, several readings per check item, limits that change with the product, and a trigger that issues it automatically. This lesson builds the CoreForge sample plant's Machining - First Article Inspection, the same one Developer Training builds. Quality Inspectors then complete it in Measure Against Tolerances.
Building a check sheet, attributes and item sets needs the Configure Quality security function. Turning on quality triggers for a machine needs Configure Assets.
On your plant's gateway, use your own item sets, attribute, check items and limits. The pattern is the same: group the items that share a specification, give the attribute a tolerance for each group, and let the check item use the attribute.
The build has three parts.
Item Sets and the FAI Diameter Attribute
Reference Materials: Item Sets
Product (Items) are naturally grouped in Item Classes. However it is possible that you may want to group a set of items that are in different classes when configuring check sheets that should only be enabled for a certain grouping of products. Item Sets can also be used to group together items that share a common set of tolerance specifications and the ability to do this really simplifies the management of tolerances rather than having to specify the same tolerances for every product you have.
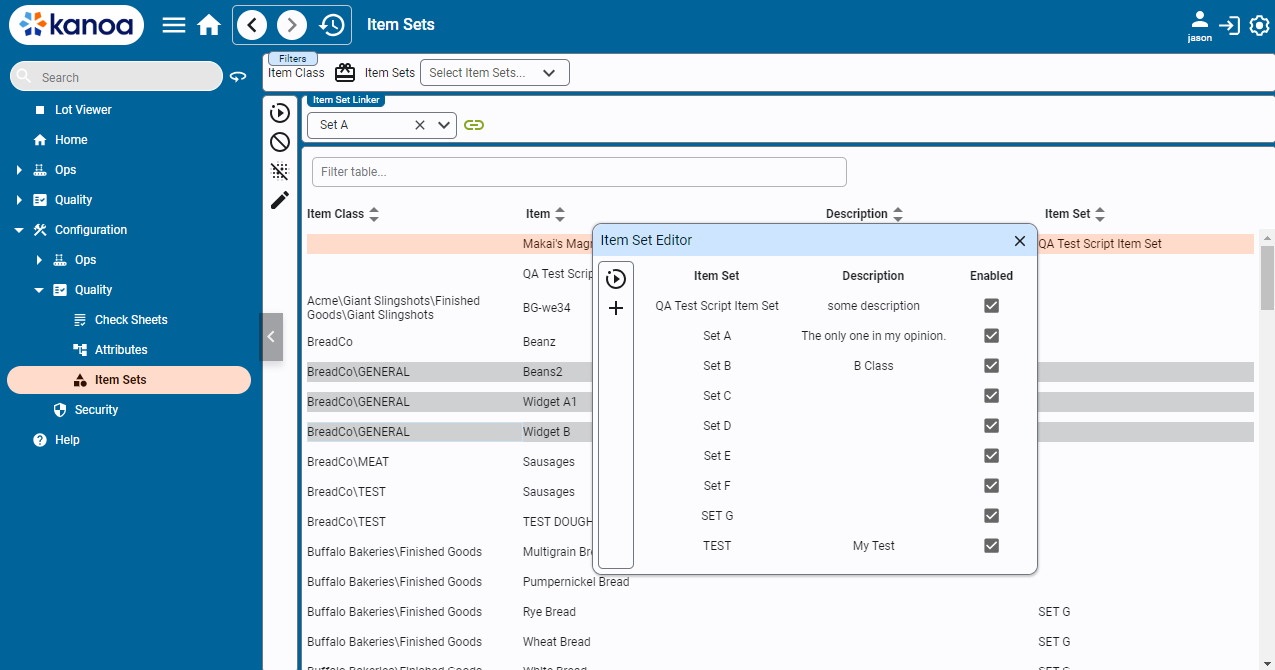
Use the  to open up the Item Set Editor. you can add, edit and delete Item sets here.
Select any number of items and press the  to link these items together.
Note An item can only belong to one item set at a time, ensuring clarity in determining which tolerances apply.
All nine machined parts are in one item class, CoreForge\WIP\Machined, but they belong to three families with different specs. An item set groups items when the item classes don't match the grouping you need. Each item can belong to only one item set.
- Navigate to Configuration → Quality → Item Sets and click the pencil icon (Edit Item Sets) on the left side to open the item set editor.
- Create three enabled item sets:
Coupling Pins,Precision RodsandShaft Cores. - Link
CP-2024,CP-6061andCP-7075toCoupling Pins, thePR-items toPrecision Rods, and theSC-items toShaft Cores.
Reference Materials: Attribute Tolerances
Tolerances
One or more specifications (or tolerances) can be added to an attribute. A tolerance can be applied to all items by leaving the Asset, Item and Item Set fields blank. Otherwise, the Asset and Item selectors can be used to set tolerances by individual item, asset or item set. To add a new tolerance, click the
Add Tolerance button on the left of the Tolerance tab.When a check is to be taken, it will first check if a tolerance exists for the current item. If no tolerance is found, it will check if the current item belongs to an item set that has a tolerance. If no item set tolerance has been configured, it will use the tolerance defined for all items.
Only enabled tolerances are used. Clear a tolerance's Enabled checkbox to stop it applying without deleting it; the next best-fit enabled tolerance is used instead. A new tolerance starts enabled, and the table's Enabled column shows each one's setting.
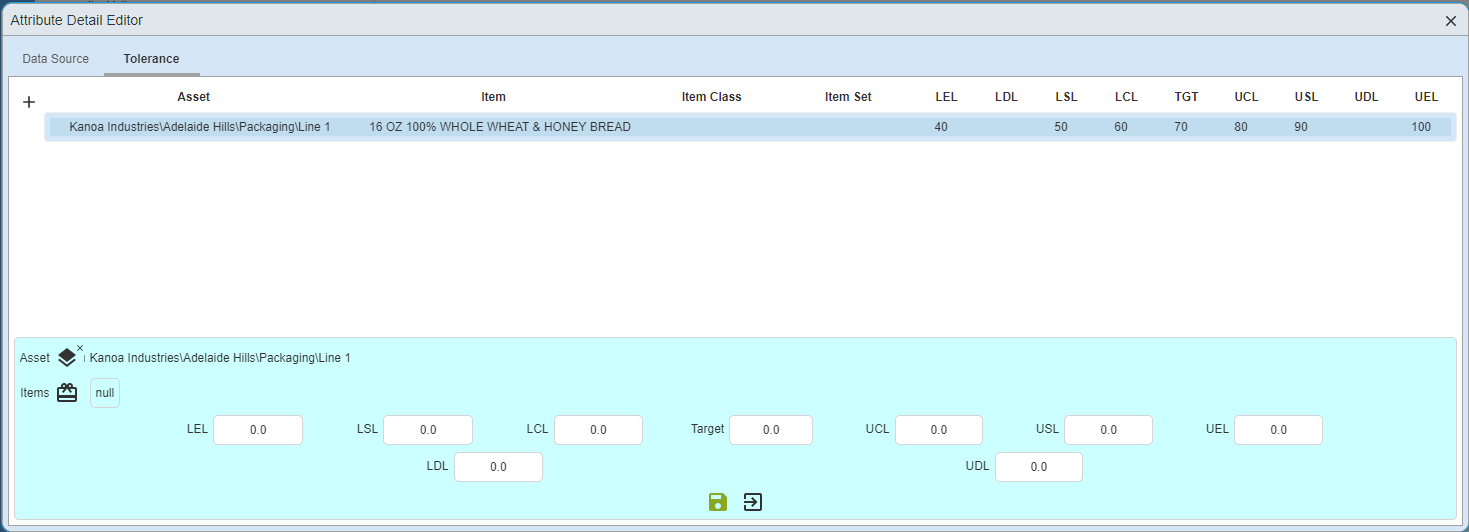
Tolerance Parameters
- LEL Lower Entry Limit: Defines the minimum value that can be entered.
- LSL Lower Spec Limit: Defines the lower Pass / Fail condition. Failing values will be highlighted red.
- LCL Lower Control Limit: Defines the lower limit condition. Values below the LCL will be considered as passing but will be highlighted orange.
- Target: Defines the expected ideal value
- UCL Upper Control Limit: Defines the upper limit condition. Values exceeding the UCL will be considered as passing but will be highlighted orange.
- USL - Upper Spec Limit: Defines the upper Pass / Fail condition. Failing values will be highlighted red.
- UEL - Upper Entry Limit: Defines the maximum value that can be entered.
Tolerance parameter values must make logical sense or will be highlighted in red as a warning. For instance, the Upper Entry Limit cannot be smaller than the Lower Entry Limit.
An attribute is a named quality variable, such as a diameter, that check items can refer to. Its tolerances can be set per asset, item, item set, or for all items, so the check item doesn't need a hard-coded spec.
-
Navigate to Configuration → Quality → Attributes.
-
Create the folder
CoreForgeand a sub-folder underneath calledMachining. -
Create an attribute
FAI Diameterin the folderCoreForge\Machining. -
On its Tolerance tab, add one tolerance for each item set (all values in mm):
Item set LEL LSL LCL Target UCL USL UEL Coupling Pins9.85 9.90 9.95 10.00 10.05 10.10 10.15 Precision Rods14.80 14.88 14.94 15.00 15.06 15.12 15.20 Shaft Cores24.70 24.82 24.91 25.00 25.09 25.18 25.30 Show the FAI Diameter Attributes
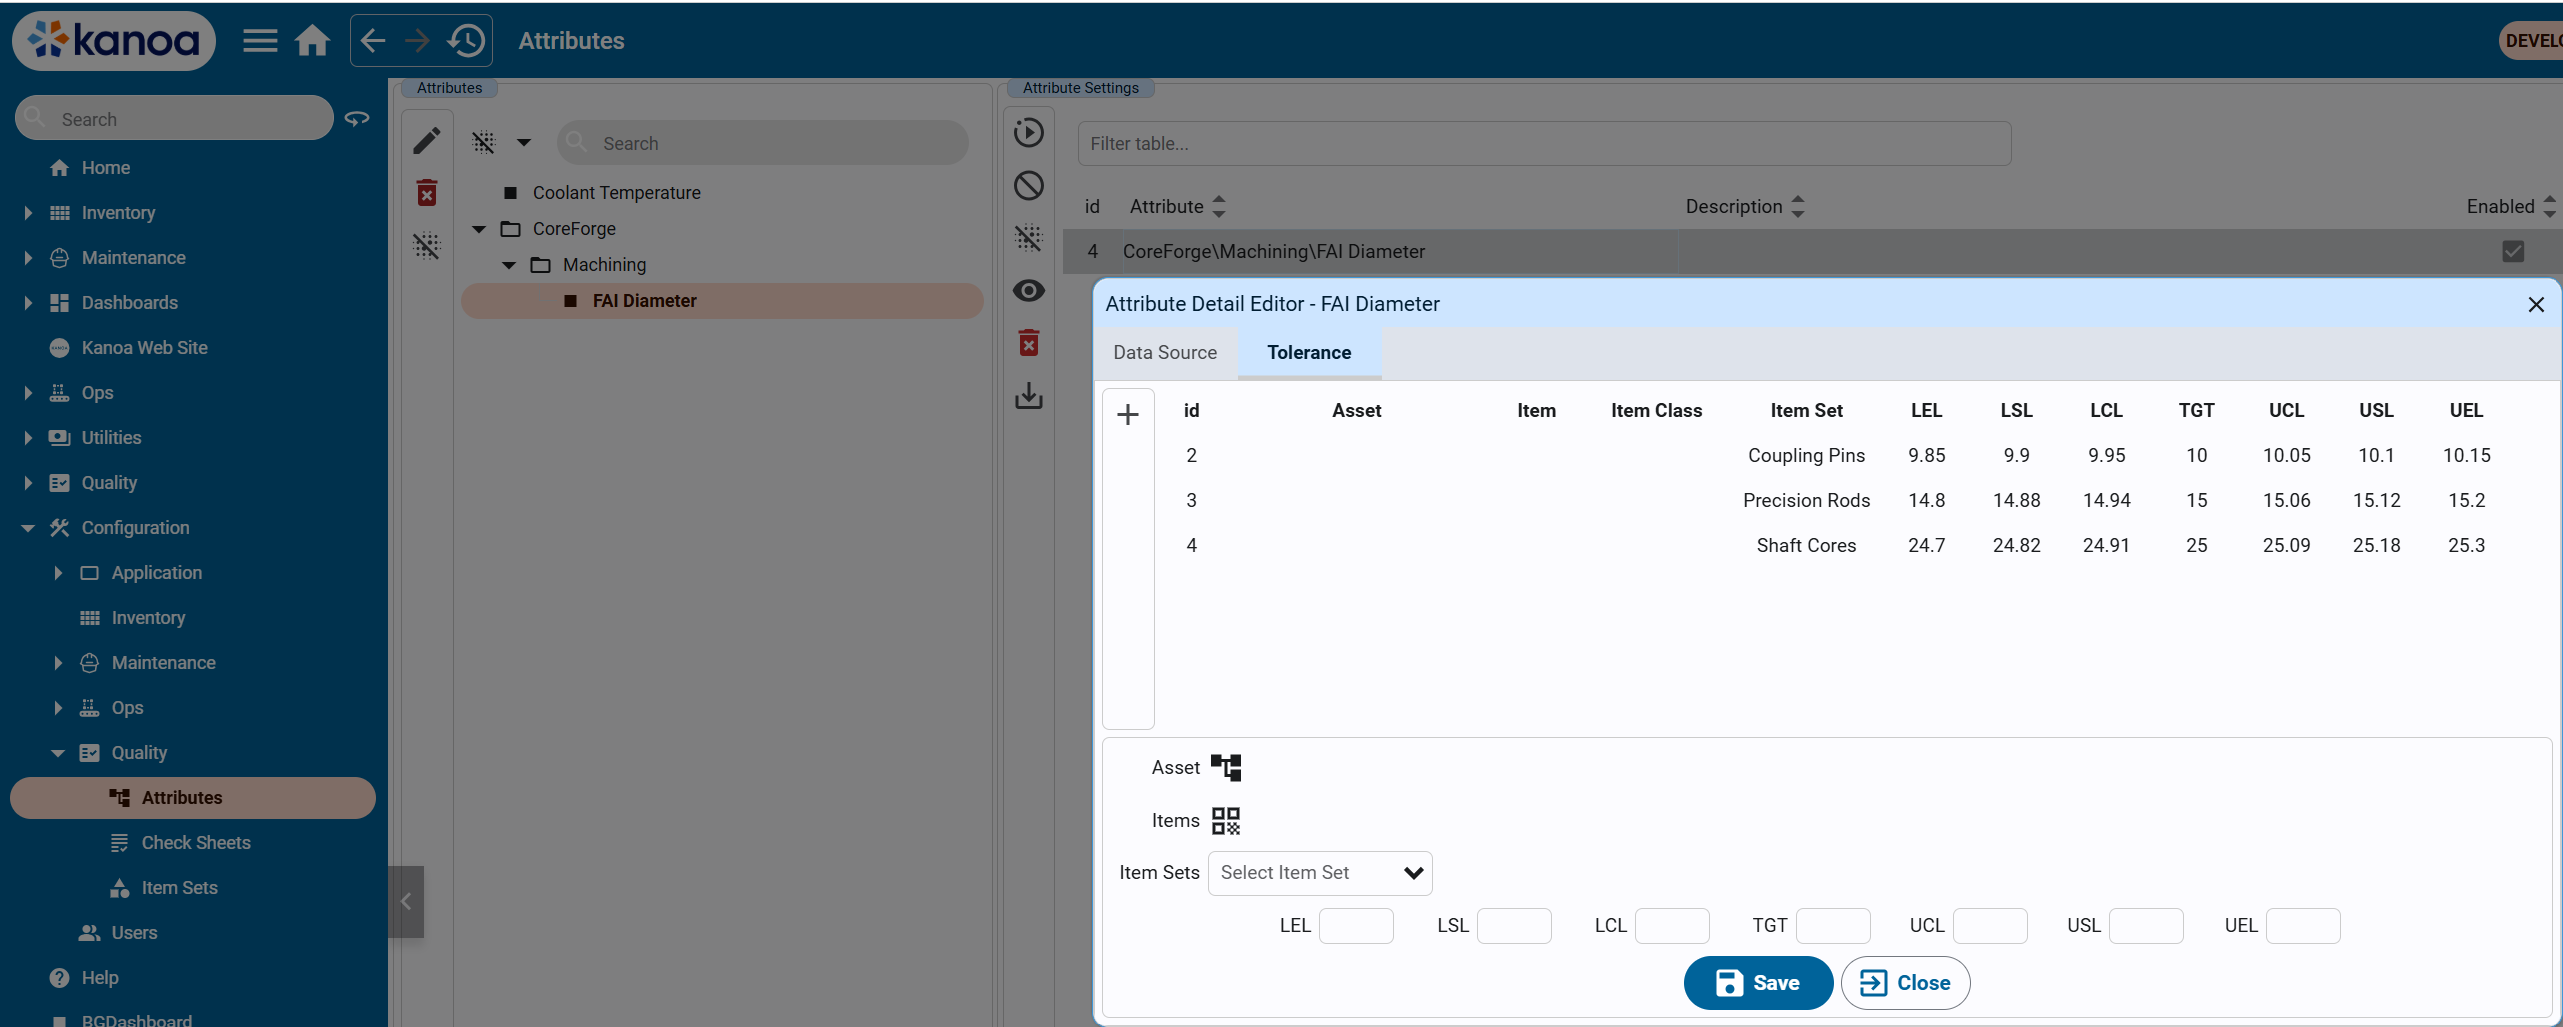
-
Make sure Enabled is checked (it is for a new tolerance), and save.
A value between the control and spec limits passes but is highlighted as a warning. A value outside the spec limits (LSL/USL) fails. A value outside the entry limits (LEL/UEL) can't be entered.
Build the First Article Inspection
Reference Materials: Asset settings, including Enable Quality Triggers
Creating Assets
Assets are configured by navigating to Configuration > Ops > Assets.
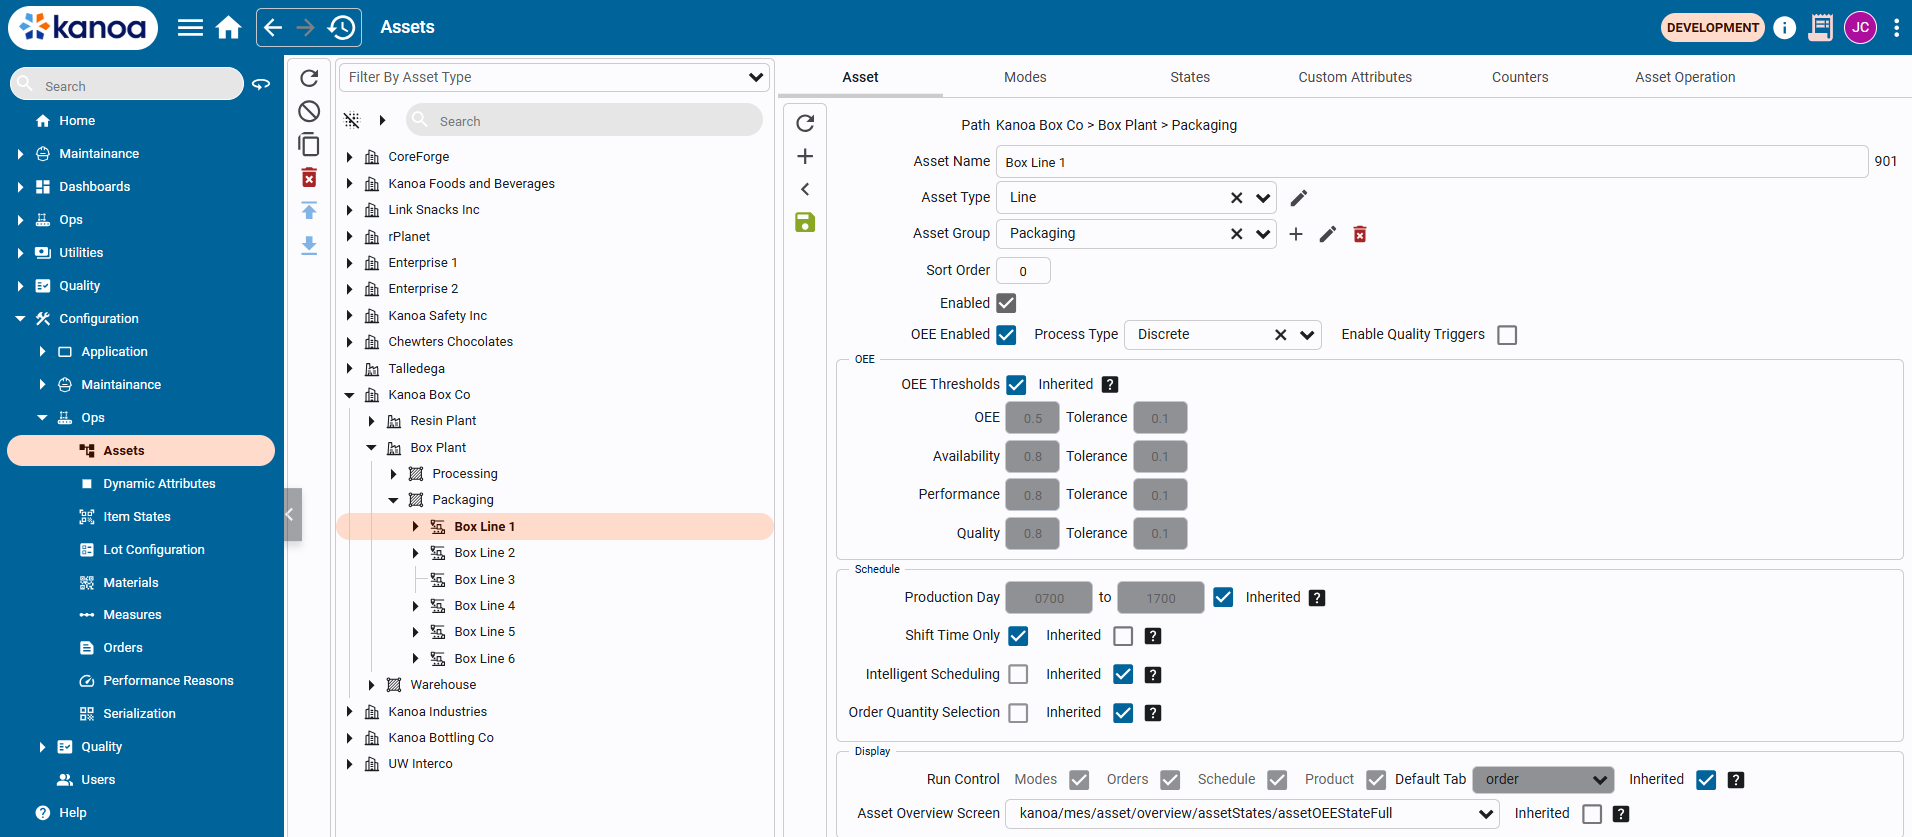
Once an asset has been created, it can be duplicated or exported. All configuration information such as mode links, state links, item links are duplicated / exported along with the asset. Exported assets can then be transferred between gateways such as from dev to prod.
| Field | Description |
|---|---|
| Asset Name | The name of the asset. Asset names must be unique within the parent. |
| Asset Type | Used for defining the type of an asset, akin to the ISA-95 hierarchy (e.g. enterprise, site, region). To configure asset types, use the edit button next to the right of the asset group dropdown. Ticking Mobile on an asset type makes its assets carriers, such as totes or carts, that lots can be on; see Transports (Mobile Assets). |
| Asset Group | An asset can be associated with a group such as 'shredders'. Grouping allows for analysis of assets that may not be in the same hierarchical area but need to be reported similarly. For instance, assets like 'box formers' across different lines can be grouped under a single asset group for consolidated reporting. To add an asset to a group, simply select the group from the dropdown. If the group doesn't exist, start typing the name of the group into the dropdown and select 'create'. |
| Sort Order | Determines the asset's position relative to others. |
| Enabled | Enable or disable this asset |
| OEE Enabled | One of the primary uses of an asset in Kanoa Ops is enabling it for OEE tracking. An OEE_Enabled Asset refers to any physical piece of equipment such as a production line, vessel reactor or process cell where operational data such as counts and equipment can be obtained and needs to be monitored. If an asset is OEE_Enabled, targets can be set for performance, availability, quality, and overall threshold that are used in visual indicators while an asset is in production. An instance of our assetOEE tag UDT is also created in the [Kanoa] tag provider that provides a mechanism for connecting the physical machine to our MES. See the [Configuring Tags] section below. |
| Process Type | When asset is 'OEE Enabled', asset process type can be configured as 'discrete, continuous or batch. Assets of type batch are configured differently for OEE performance calculation |
| Enable Quality Triggers | When asset is 'OEE Enabled', enabling this setting will cause changes to this asset mode or shift to check if a quality check should be scheduled. |
Kanoa only watches assets for quality triggers when you ask it to, so it doesn't spend effort on assets that never need checks.
- Navigate to Configuration → Ops → Assets and select
CoreForge\Philadelphia\Machining\Machine 1. - Select Enable Quality Triggers and save. The option is only available on OEE-enabled assets.
- Repeat for
Machine 2throughMachine 8.
The FAI needs both an asset, to know which machine and operator it belongs to, and an item, to know which tolerance applies.
- In Configuration → Quality → Check Sheets, add
Machining - First Article Inspectionin theCoreForge\Operationsfolder. - On the Info tab, enter:
- Description:
First article inspection for machined parts at the start of a production run or after changeover. - Procedure:
Machining FAI Procedure - Document:
https://44110182.fs1.hubspotusercontent-na1.net/hubfs/44110182/Demo/workInstructionSample260120.pdf - Instructions:
Measure the first part produced after starting the run. Enter all required dimensional measurements and complete the visual defect check before continuing production.
- Description:
- On the Settings tab, select Asset Required with the
CoreForge\Philadelphia\Machiningarea, and Item Required with theCoreForge\WIP\Machinedclass.
Use Instructions for short guidance in the form, and Document to link to a controlled procedure or work instruction.
All three are Type Check, Enabled and Required.
| Check item | Data type | Measurements | Aggregation | Units | Specification |
|---|---|---|---|---|---|
Diameter | Float | 3 | Average | mm | The attribute's tolerance (below) |
Length | Float | 2 | Max | mm | Range, min 100, max 200 |
Visual Defect Check | String | 1 | Text (below) |
Diameter's specification comes from an attribute:
- Click Assign Attribute and pick
CoreForge\Machining\FAI Diameter. - Then, in the Specification section under Tolerance, choose Use Attribute Tolerance. It only shows up once the attribute is assigned. Leave Dynamic cleared.
Visual Defect Check's specification is Text, with these options:
- Pass:
No visible defects - Warning:
Minor cosmetic defect - Fail:
Burrs present,Surface damage,Incorrect finish
With more than one measurement, Kanoa keeps every reading and evaluates the aggregate. Length readings of 150 and 205 give a Max of 205, which fails.
Diameter uses the attribute because its spec changes with the part family. Length uses a fixed range on the check item because it's the same for every part.
Reference Materials: Check Item Settings - Data Properties
Check Item Settings - Data Properties
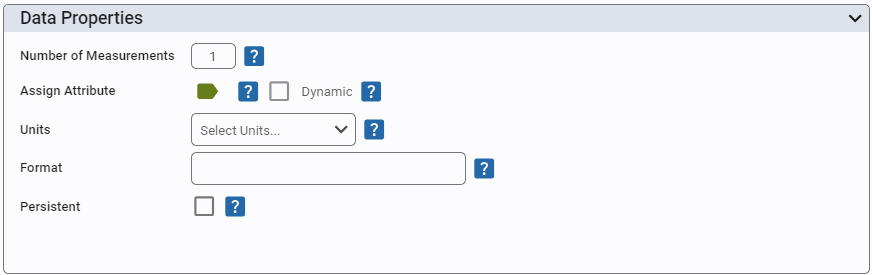
- Number of Measurements: Set the # of measurements to be taken for this check. Allows for within-subgroup variance analysis.
- Assign Attribute: Attributes are used to associate a check with a tolerance spec and a data source tag path. A check reads its value from either an attribute or its own data source tag, so Assign Attribute is hidden while a data source tag is set.
- Data Source Tag: A tag the check reads its value from without an attribute, for a value that isn't specific to an asset (a utility supply temperature, say). Type the tag path or browse for it with the tag button. Like an attribute's data source, the tag is read when the check is triggered by a trigger check, and on an auto check sheet. Shown when the check has no attribute.
- Scale Factor: The tag value is multiplied by this; empty is 1.
- Ignore Zero Values: A zero read from the tag is treated as no value.
- Dynamic: When enabled, this check item will only be shown when a valid tolerance can be found for the associated attribute. Usage is to prevent displaying checks that may not be valid for certain items (products/materials).
- Units: Define engineering units for data display. Standard units are added for you, including °C, °F, µm, mL, kPa, N·m, pH, ppm, µS/cm, Ω and kΩ; any other unit can be typed in, with any symbol.
- Format: Enter a format string for data presentation following the custom numeric string format i.e. #,##0.##
- Persistent: When enabled, persistence will copy over the value entered the last time this check was taken. If asset and/or item is required, it will use previous value for that asset/item combination.
Specification
- Tolerance: Only shown if check datatype is a String or Number. Number choices are: 'Attribute Tolerance' (if check item is associated with an attribute), 'Tolerance', 'Set Point' and 'Range'. String choices are: 'Regex'.
- Range: A value outside the range is saved as a failed check. Optional Entry Limits (Lower and Upper Entry Limit) go further: a value outside them is refused when it is entered, with a message, rather than saved. Set the entry limits to the range itself to make the range strict, so a value outside it can't be entered at all. A value between the entry limits but outside the range is still accepted and saved as failed. The entry limits are shown in red when they sit inside the range.
Once the check sheet is released, every machine with quality triggers turned on issues an FAI each time it enters Production. To change it after that, revise it: see Release and Revise.
Check Your Understanding
- Why does the Diameter check item use an attribute, while Length has a fixed range?
- What must be turned on for a machine before a trigger can issue checks for it?
- Where do the asset and item on an automatically issued FAI come from?
Answers
- Diameter's specification changes with the part family, so it comes from the attribute's tolerance for each item set. Length is the same for every part.
- Enable Quality Triggers, on the asset.
- From the production run that put the machine into Production.