Build a Receiving Inspection
A receiving inspection is a good first real check sheet: it uses several kinds of check item, requires an item, and is started by hand when a delivery arrives. This lesson builds the CoreForge sample plant's Receiving Inspection, the same one Developer Training builds. Quality Inspectors then complete it in Inspect Incoming Material.
Building a check sheet needs the Configure Quality security function.
On your plant's gateway, use your own folder, item class, suppliers and fields. The steps are the same: a check sheet that requires an item, and check items of the types your inspection needs.
Build the Receiving Inspection
The Receiving Inspection checks a delivery of raw material: who supplied it, which lot it is, when it expires and,
optionally, what it looked like. It's started by hand when a delivery arrives, needs no sign-off, and requires an item, so
every inspection is tied to the material received.
Configure the Check Sheet
Reference Materials: Check Sheet Settings
Check Sheet Settings
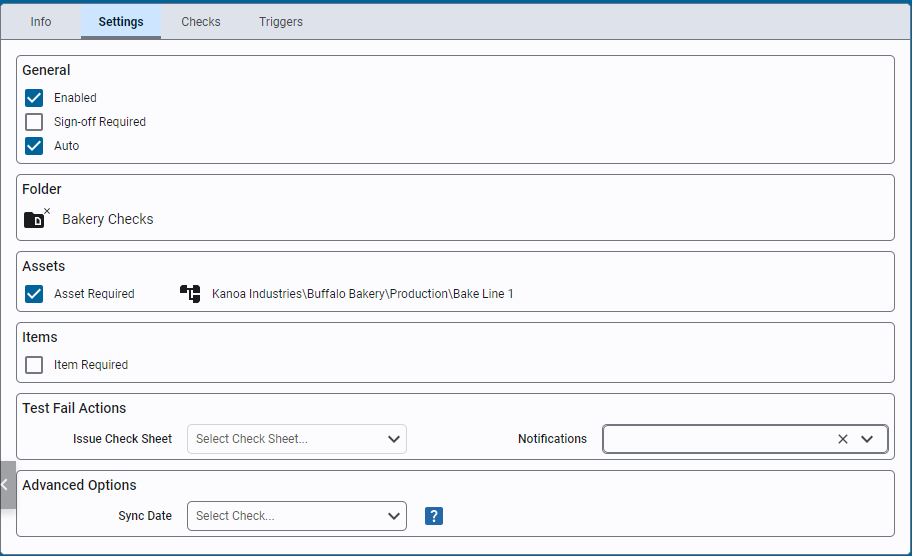
- Enabled: Enable or disable a check sheet.
- Sign Off Required: Require a sign off for approval. If unchecked a submitted check sheet is automatically moved to the 'Approved' status. Only approved checks are used in SPC analysis.
- Auto: Indicate that this check sheet only contains checks whose values will be automatically captured when the check sheet is triggered. Add Check leaves Auto check sheets out of its list unless Include Auto Checks is ticked.
- Folder: Saves the check sheet in a specific folder.
- Asset Required: Determines if an asset must be selected for this check sheet.
- Item Required: Determine if an items must be selected for this check sheet.
- Issue Check Sheet: Choose a check sheet to schedule immediately upon test failure.
- Notifications: Select a team or user for email notifications on test failure.
- Sync Date: The 'Taken Date' of the Check Sheet by default is the date the check sheet is submitted. You can override this to force all check items and the check sheet itself to use the datetime picked for a check that is of datetime data type. This can be used when all check items are to be referenced to say the 'code time' printed on a product. To use this feature, simply create a check item that is of data type 'datetime' and then select it in this dropdown. When the user selects the date time, it will now be used for the 'Taken Time'.
- Navigate to Configuration → Quality → Check Sheets and add a check sheet named
Receiving Inspection. - On the Settings tab, click the folder button to open folder management.
- Create
WarehouseandOperationsfolders underCoreForge. - Put the check sheet in
CoreForge\Warehouse. - Select Item Required and choose the item class
CoreForge\RM.
- Folders keep check sheets organized as the list grows. Group them by whatever your users look for: department, process area, check type, quality program, customer or site.
- Item Required makes the user pick an item when they start the check. Limiting the choice to an item class keeps the list short and reuses the plant's item master, so nobody retypes material names.
- The item gives each inspection its context and restricts what can be picked. A check sheet can also use the item to look up a different tolerance for each part family.
Add Check Items
Reference Materials: Check Item Settings - General
Check Item Settings - General
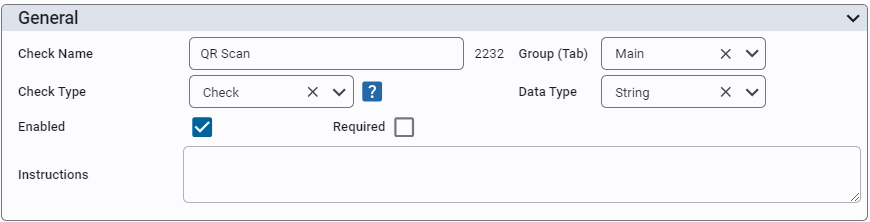
Give your check item a name and assign it to a group. You can enable or disable it and determine whether it is a required or optional check. You can also add instructions that are displayed to the user when they select this check item.
Check Type
There are several check types you can select from...
- Check This is the main check type in that this check item will receive a value and store it against this check item.
- Calculated A calculated check will perform a custom calculation based on the values of other check items. Those check items can be check types or calculated types themselves.
- Trigger A trigger check is used to trigger the capture of other check item values.
Data Type This property defines the expected type of data expected to be received by this check and this selection drives other check item selections, including the component presented to the use to input the value. Options are Boolean, Datetime, Float, Geo Location, Image, Integer, String.
Reference Materials: Check Item Settings - Data Properties
Check Item Settings - Data Properties
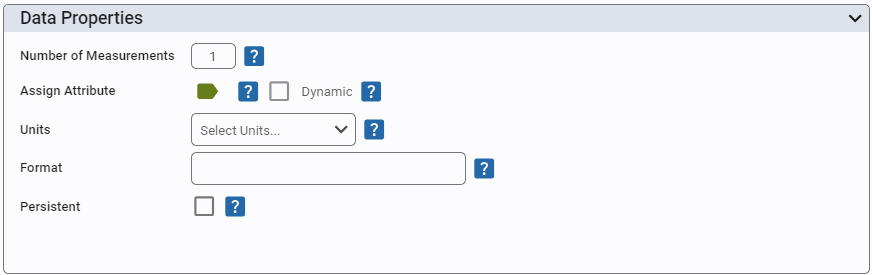
- Number of Measurements: Set the # of measurements to be taken for this check. Allows for within-subgroup variance analysis.
- Assign Attribute: Attributes are used to associate a check with a tolerance spec and a data source tag path. A check reads its value from either an attribute or its own data source tag, so Assign Attribute is hidden while a data source tag is set.
- Data Source Tag: A tag the check reads its value from without an attribute, for a value that isn't specific to an asset (a utility supply temperature, say). Type the tag path or browse for it with the tag button. Like an attribute's data source, the tag is read when the check is triggered by a trigger check, and on an auto check sheet. Shown when the check has no attribute.
- Scale Factor: The tag value is multiplied by this; empty is 1.
- Ignore Zero Values: A zero read from the tag is treated as no value.
- Dynamic: When enabled, this check item will only be shown when a valid tolerance can be found for the associated attribute. Usage is to prevent displaying checks that may not be valid for certain items (products/materials).
- Units: Define engineering units for data display. Standard units are added for you, including °C, °F, µm, mL, kPa, N·m, pH, ppm, µS/cm, Ω and kΩ; any other unit can be typed in, with any symbol.
- Format: Enter a format string for data presentation following the custom numeric string format i.e. #,##0.##
- Persistent: When enabled, persistence will copy over the value entered the last time this check was taken. If asset and/or item is required, it will use previous value for that asset/item combination.
Specification
- Tolerance: Only shown if check datatype is a String or Number. Number choices are: 'Attribute Tolerance' (if check item is associated with an attribute), 'Tolerance', 'Set Point' and 'Range'. String choices are: 'Regex'.
- Range: A value outside the range is saved as a failed check. Optional Entry Limits (Lower and Upper Entry Limit) go further: a value outside them is refused when it is entered, with a message, rather than saved. Set the entry limits to the range itself to make the range strict, so a value outside it can't be entered at all. A value between the entry limits but outside the range is still accepted and saved as failed. The entry limits are shown in red when they sit inside the range.
The data type of a check item decides what the user sees when they fill it in: a pick list, a text box, a date picker or an image upload. Validation rules make sure the value is usable before it's saved.
-
Open
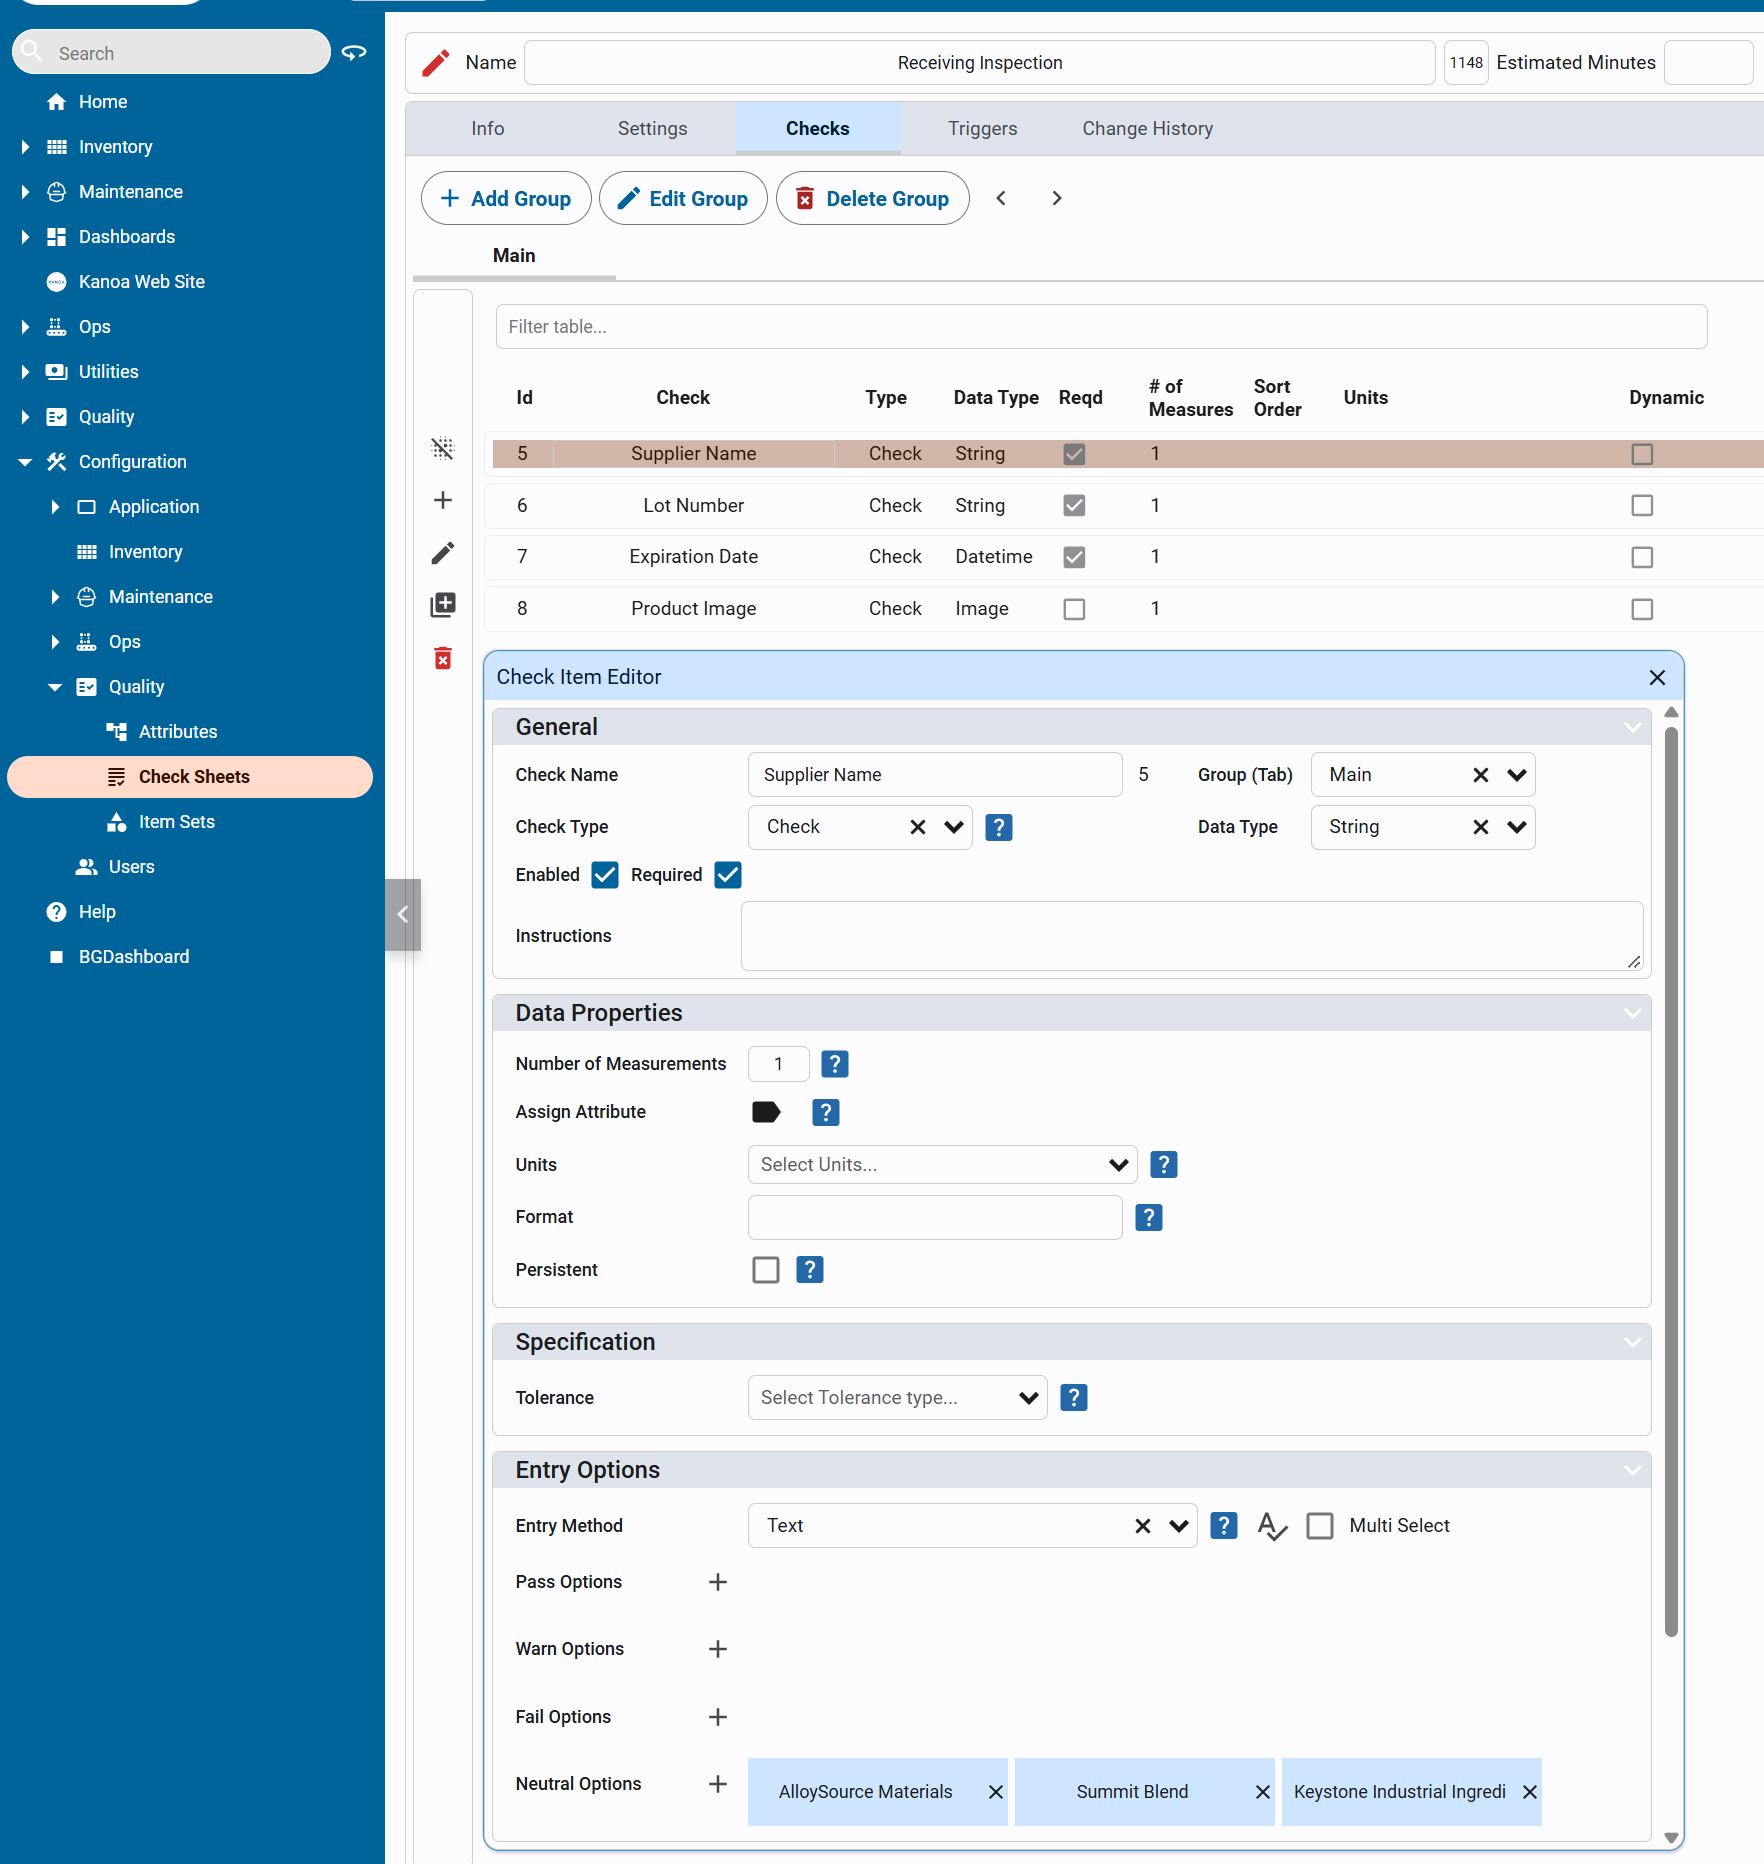
Receiving Inspectionand add these check items on the Checks tab. All are TypeCheckand Enabled.Check item Data type Required Settings Supplier NameString Yes Entry Options Textwith the Neutral responsesAlloySource Materials,Summit BlendChemandKeystone Industrial IngredientsLot NumberString Yes Instructions: Must be between 6 and 20 characters and all letters must be capitalized.Specification: Regex^[A-Z0-9]{6,20}$Expiration DateDatetime Yes Product ImageImage No Show the check items
-
Close the editor and release the check sheet.
- The supplier responses are Neutral: they record information but don't pass or fail the check. Users can also type a supplier that isn't in the list.
- Enabled decides whether an item appears at all. Required decides whether the check can be submitted with it blank.
- The regex only accepts 6 to 20 uppercase letters and digits, so
LOT20260515is accepted andab123isn't.
Releasing the check sheet makes it available to every user straight away. To change it after that, revise it: see Release and Revise.
Check Your Understanding
- Why does the Receiving Inspection require an item?
- What does a Neutral supplier response do?
- A user enters the lot number
ab123. What happens, and why?
Answers
- It ties each inspection to the material received, and limits the choice to raw material items.
- It records the supplier without passing or failing the check.
- It's refused. The lot number must be 6 to 20 uppercase letters and digits.