Build a Check Sheet
A check sheet is the reusable template for a check, like a blank form. Each question on it is a check item. You build the form once, and Quality Inspectors fill it in each time it is due. This lesson shows you how to create a check sheet and set up its checks. Nothing is recorded while you build.
Building a check sheet needs the Configure Quality security function.
Create the Check Sheet
- Open Configuration → Quality → Check Sheets.
- Add a check sheet and give it a name. You must name it before you can do anything else with it.
- Click outside the name field. Kanoa saves the check sheet as soon as it has a name.

The editor has four tabs:
- Info holds a description and links to other documents, such as SOPs.
- Settings holds the general settings.
- Checks holds the questions to answer.
- Triggers holds what schedules the check sheet. The next lesson covers it.
Estimated Minutes is how long you expect a manual check sheet to take. Entering a value adds a duration check item that the inspector fills in, so you can see how long the checks really take.
Choose the Settings
On the Settings tab, choose how the check sheet behaves.
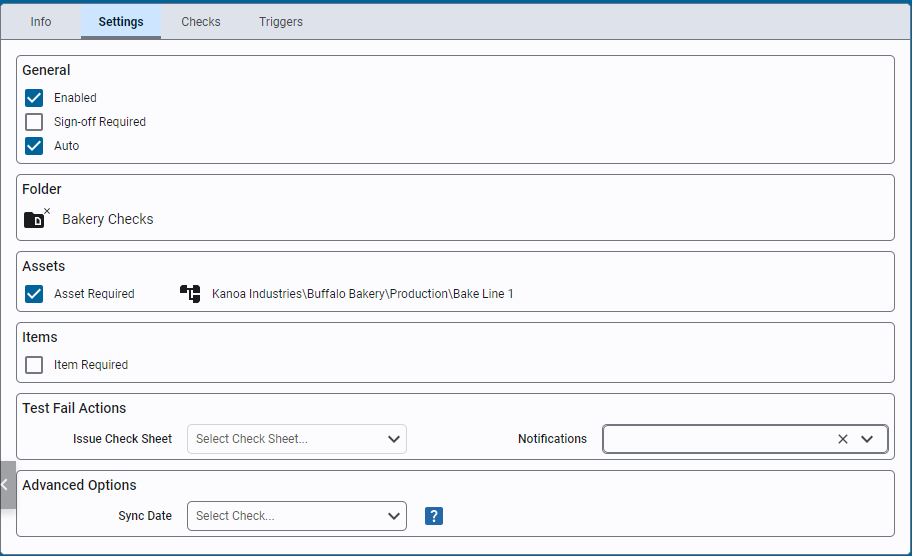
| Setting | What it does |
|---|---|
| Enabled | Turns the check sheet on or off. |
| Sign Off Required | A submitted check waits for approval. If cleared, it goes straight to Approved. |
| Auto | The check sheet holds only checks whose values are captured automatically. |
| Folder | Saves the check sheet in a folder. |
| Asset Required / Item Required | The inspector must choose an asset or an item. |
| Issue Check Sheet | Another check sheet to schedule right away when a test fails. |
| Notifications | A team or user to email when a test fails. |
| Sync Date | Uses a datetime check as the Taken Date of every check on the sheet. |
Only Approved checks are used in reports and SPC. That makes Sign Off Required your quality gate. The sample Cleanliness Check clears it. The sample Offline Lab Inspection sets it.
Reference Materials: Check Sheet Settings - Every setting on the Settings tab.
Check Sheet Settings
- Enabled: Enable or disable a check sheet.
- Sign Off Required: Require a sign off for approval. If unchecked a submitted check sheet is automatically moved to the 'Approved' status. Only approved checks are used in SPC analysis.
- Auto: Indicate that this check sheet only contains checks whose values will be automatically captured when the check sheet is triggered. Add Check leaves Auto check sheets out of its list unless Include Auto Checks is ticked.
- Folder: Saves the check sheet in a specific folder.
- Asset Required: Determines if an asset must be selected for this check sheet.
- Item Required: Determine if an items must be selected for this check sheet.
- Issue Check Sheet: Choose a check sheet to schedule immediately upon test failure.
- Notifications: Select a team or user for email notifications on test failure.
- Sync Date: The 'Taken Date' of the Check Sheet by default is the date the check sheet is submitted. You can override this to force all check items and the check sheet itself to use the datetime picked for a check that is of datetime data type. This can be used when all check items are to be referenced to say the 'code time' printed on a product. To use this feature, simply create a check item that is of data type 'datetime' and then select it in this dropdown. When the user selects the date time, it will now be used for the 'Taken Time'.
Add Checks and Check Groups
On the Checks tab, a check sheet can hold any number of checks. Checks are grouped into tabs, so you can keep related questions together.
- Click the add button to add a check, or the edit button to change one.
- Give the check a name and choose its group.
- Set whether it is Enabled and whether it is required or optional.
- Add Instructions. Inspectors read them when they select the check.
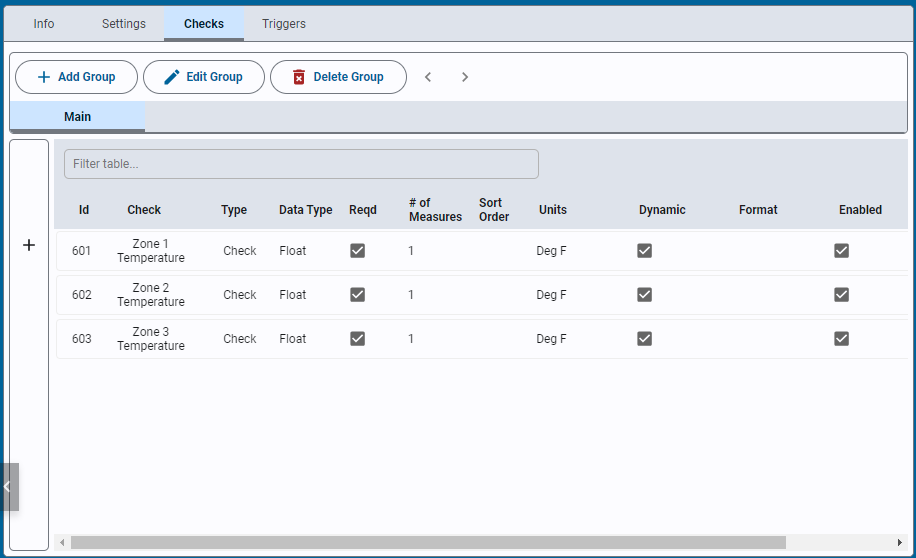
While the check sheet is a Draft or In Revision, the buttons above the checks add, edit, copy and delete groups. The arrows move a group left or right. Copy Group copies a group and all its checks, settings and specifications as a new tab on the same check sheet.
Check Type and Data Type
Each check has a Check Type:
- Check receives a value and stores it.
- Calculated works out a value from other checks. You can choose an aggregate, such as Average, Sum, Range, Min, Max or Standard Deviation, or write a formula.
- Trigger captures the values of other checks, such as values read from a PLC.
The Data Type is the kind of value expected: Boolean, Datetime, Float, Geo Location, Image, Integer or String. It decides what the inspector sees when entering the value.
Custom calculation scripts need the Ignition Designer. That work belongs to the Developer Training.
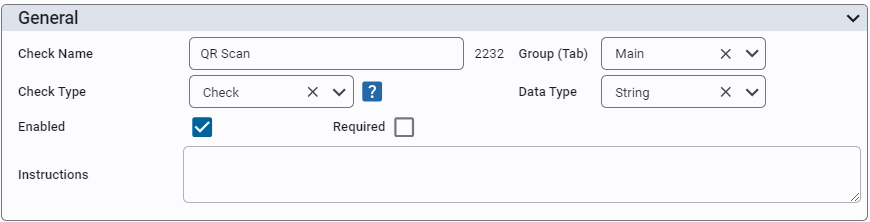
Reference Materials: Check Item Settings, General - Name, group, type and data type.
Check Item Settings - General
Give your check item a name and assign it to a group. You can enable or disable it and determine whether it is a required or optional check. You can also add instructions that are displayed to the user when they select this check item.
Check Type
There are several check types you can select from...
- Check This is the main check type in that this check item will receive a value and store it against this check item.
- Calculated A calculated check will perform a custom calculation based on the values of other check items. Those check items can be check types or calculated types themselves.
- Trigger A trigger check is used to trigger the capture of other check item values.
Data Type This property defines the expected type of data expected to be received by this check and this selection drives other check item selections, including the component presented to the use to input the value. Options are Boolean, Datetime, Float, Geo Location, Image, Integer, String.
Set the Data Properties
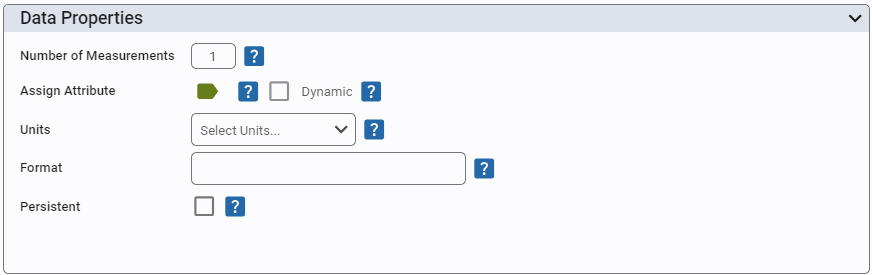
- Number of Measurements is how many readings to take per check. It allows within-subgroup variance analysis.
- Assign Attribute ties the check to a tolerance and a data source. The next lesson covers attributes.
- Data Source Tag reads the value from a tag when there is no attribute.
- Dynamic shows the check only when a valid tolerance exists for the item.
- Units sets the engineering units, such as °C, µm or ppm.
- Format sets how the value is shown.
- Persistent copies over the value entered the last time the check was taken.
Reference Materials: Check Item Data Properties - Measurements, attributes, units and format.
Check Item Settings - Data Properties
- Number of Measurements: Set the # of measurements to be taken for this check. Allows for within-subgroup variance analysis.
- Assign Attribute: Attributes are used to associate a check with a tolerance spec and a data source tag path. A check reads its value from either an attribute or its own data source tag, so Assign Attribute is hidden while a data source tag is set.
- Data Source Tag: A tag the check reads its value from without an attribute, for a value that isn't specific to an asset (a utility supply temperature, say). Type the tag path or browse for it with the tag button. Like an attribute's data source, the tag is read when the check is triggered by a trigger check, and on an auto check sheet. Shown when the check has no attribute.
- Scale Factor: The tag value is multiplied by this; empty is 1.
- Ignore Zero Values: A zero read from the tag is treated as no value.
- Dynamic: When enabled, this check item will only be shown when a valid tolerance can be found for the associated attribute. Usage is to prevent displaying checks that may not be valid for certain items (products/materials).
- Units: Define engineering units for data display. Standard units are added for you, including °C, °F, µm, mL, kPa, N·m, pH, ppm, µS/cm, Ω and kΩ; any other unit can be typed in, with any symbol.
- Format: Enter a format string for data presentation following the custom numeric string format i.e. #,##0.##
- Persistent: When enabled, persistence will copy over the value entered the last time this check was taken. If asset and/or item is required, it will use previous value for that asset/item combination.
Specification
- Tolerance: Only shown if check datatype is a String or Number. Number choices are: 'Attribute Tolerance' (if check item is associated with an attribute), 'Tolerance', 'Set Point' and 'Range'. String choices are: 'Regex'.
- Range: A value outside the range is saved as a failed check. Optional Entry Limits (Lower and Upper Entry Limit) go further: a value outside them is refused when it is entered, with a message, rather than saved. Set the entry limits to the range itself to make the range strict, so a value outside it can't be entered at all. A value between the entry limits but outside the range is still accepted and saved as failed. The entry limits are shown in red when they sit inside the range.
Set a Specification
For a String or number check, the Specification section sets the Tolerance. For a number, the choices are Attribute Tolerance (when the check has an attribute), Tolerance, Set Point and Range. For a String, the choice is Regex.
A Range works in two layers:
- A value outside the range is saved as failed.
- Entry Limits go further. A value outside them is refused when it is entered, with a message.
Set the entry limits equal to the range to make the range strict. A value outside it can't be entered at all.
Choose Entry Options
Entry options decide how an inspector enters the value. You don't need one. A text or number field always works, and the typed value is validated.
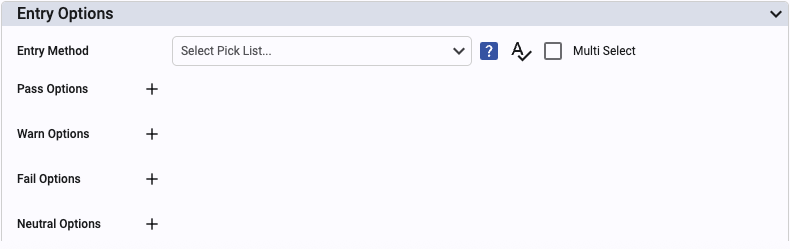
The options depend on the data type:
- Boolean and Text make buttons from the values you list.
- Number and Fraction make buttons from the attribute tolerance, or from the values you list.
- Time shows a keypad for hours, minutes and seconds.
- Tree shows a tree selector.
- Barcode Scanner scans a barcode with a mobile device camera.
For the cleanliness check, a Text pick list has the responses Clean as Pass, Passable as Warning, and
Over-Cluttered and Dirty as Fail. One Fail on a required item makes the whole check not OK. A Warning doesn't.
Reference Materials: Entry Options - What each option does for each data type.
Check Item Settings - Entry Options
Entry Options allows you to present the user with a number of different ways to enter in a value for a check item. You don't need to provide an entry option, a standard text field or numeric input field will be presented to the user and keyboard entry is always permitted (but validated).
The entry options that can be selected from vary based on the check item data type....
Boolean Data Type
- Boolean: Generates buttons based on values defined in the picklist values. Pick list values are in json format. 'TRUE' defines the button(s) that will yield a 1 result, 'FALSE' a 0. i.e.
{'TRUE':['Yes'], 'FALSE':['No']}
Integer and Float Data Types
- Number: Generates buttons from attribute tolerance if it exists otherwise uses values defined in the picklist values. Pick list values are in json format. 'denominator' defines the increment part (0.1 will generate 0.1, 1.2, .3 etc. ). 'lel' and 'uel' defines the lower and upper value range, 'ucl', 'lcl', 'lsl', 'usl' defines the spec limit. i.e.
{'denominator':0.5, 'lel':1,'lsl':1.1, 'lcl':1.8, 'tgt':2, 'ucl':2.2, 'usl':2.6, 'uel':3} - Time: Presents the user with a time key pad to enter duration in hours, minutes and seconds for a check. The value is stored in seconds.
- Fraction: Generates buttons from attribute tolerance if it exists otherwise uses values defined in the picklist values. Pick list values are in json format. 'denominator' defines the increment part (0.1 will generate 0.1, 1.2, .3 etc. ). 'lel' and 'uel' defines the lower and upper value range, 'ucl', 'lcl', 'lsl', 'usl' defines the spec limit. i.e.
{'denominator':0.5, 'lel':1,'lsl':1.1, 'lcl':1.8, 'tgt':2, 'ucl':2.2, 'usl':2.6, 'uel':3}
String Data Type
- Tree: Generates a tree selector. Selection options are generated from a comma separated list. Each option must be wrapped in single quotes and use / to create the tree structure. i.e. 'Kanoa Industries/T1-Acme, TX','Kanoa Industries/T2-Acme, TX','Kanoa Enterprises/P1','Kanoa Enterprises/P1/Line 1','Kanoa Enterprises/P2/Line 2'. Do not have spaces between tree elements
- Text: Generates buttons with the text defined in the pick list values. Pick list values are in json format. i.e.
{'PASS':["Perfect", "Good"], 'WARNING':["Fair", "Average"], 'FAIL':["Bad"],'NEUTRAL':["Doesn't Matter"]} - Boolean: Generates buttons based on values defined in the picklist values. Pick list values are in json format. 'TRUE' defines the button(s) that will yield a 1 result, 'FALSE' a 0. i.e.
{'TRUE':['Yes'], 'FALSE':['No']} - Barcode Scanner: Provides a button that will uses a mobile devices camera to scan a barcode. Only valid for devices that have a built-in camera. A custom script can be selected to further parse the scanned in bar code. Refer to 'Creating custom scripts' for more info.
Trigger: If the check sheet has checks defined as triggers, you can choose a trigger check item that will cause this check to be taken. Used primarily to pull data from an external datasource such as a plc.
Try It Before You Release
A check sheet starts as a Draft, which inspectors can't use. A user with Configure Quality can select a Draft on the Check Sheets screen and click Launch Check Sheet. This opens a test check that is deleted when you close it.
Check Your Understanding
- Which setting makes a submitted check wait for approval?
- What is the difference between a range and its entry limits?
- Which security function do you need to build a check sheet?
Answers
- Sign Off Required. If it is cleared, a submitted check goes straight to Approved.
- A value outside the range is saved as failed. A value outside the entry limits is refused when entered.
- Configure Quality.