Item Sets and Tolerances
Different products often need different limits for the same measurement. You don't want a check sheet for each one. Instead, a check refers to an attribute, and the attribute holds the tolerances. Item sets group products that share a tolerance. This lesson shows you how to set that up for the CoreForge machined parts.
Item sets and attributes need the Configure Quality security function.
Create Item Sets
Items are grouped by item class. An item set groups items from different classes, or items that share a specification. It makes tolerances easier to manage, because you set them once for the set.
- Open Configuration → Quality → Item Sets.
- Click the pencil icon (Edit Item Sets) to open the item set editor.
- Add the item sets you need. The CoreForge example uses
Coupling Pins,Precision RodsandShaft Cores. - Select the items for a set and click the link button to link them.
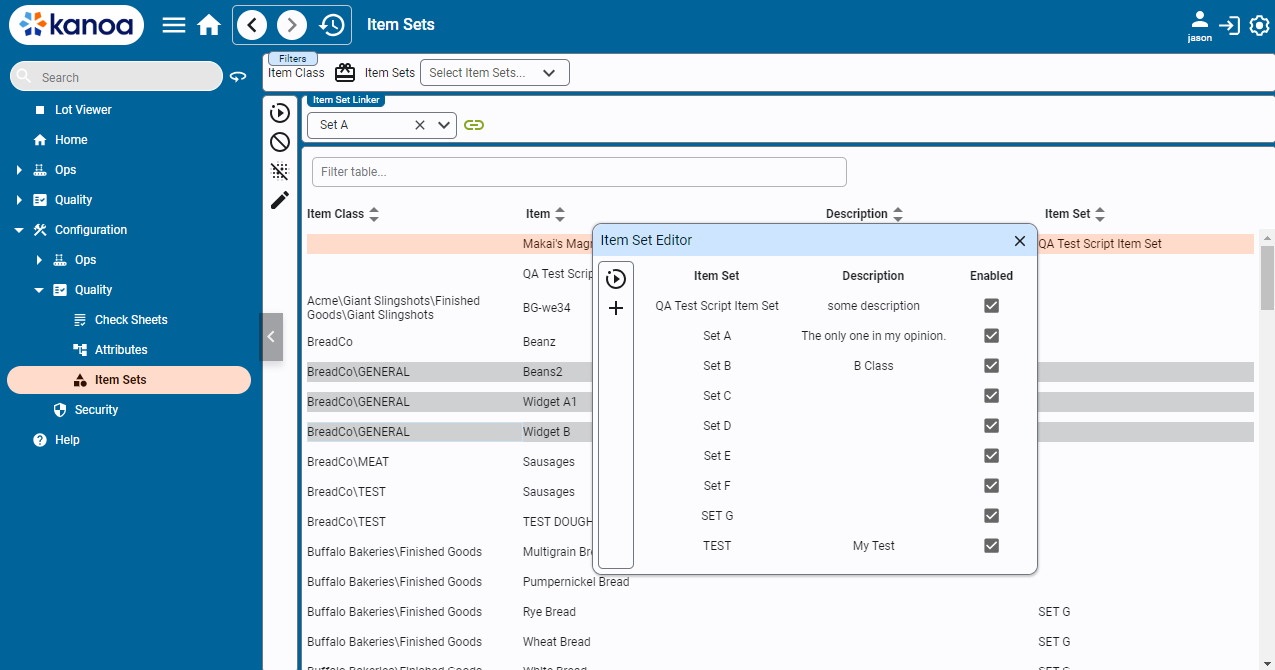
An item can belong to only one item set at a time, so it's always clear which tolerance applies.
Reference Materials: Item Sets - Grouping items to share tolerances.
Product (Items) are naturally grouped in Item Classes. However it is possible that you may want to group a set of items that are in different classes when configuring check sheets that should only be enabled for a certain grouping of products. Item Sets can also be used to group together items that share a common set of tolerance specifications and the ability to do this really simplifies the management of tolerances rather than having to specify the same tolerances for every product you have.
Use the  to open up the Item Set Editor. you can add, edit and delete Item sets here.
Select any number of items and press the  to link these items together.
Note An item can only belong to one item set at a time, ensuring clarity in determining which tolerances apply.
Create an Attribute
An attribute is a named quality variable, such as a diameter. Check items refer to it, so the check doesn't need a fixed spec. Attributes are organized in folders.
- Open Configuration → Quality → Attributes.
- Select a parent attribute in the tree, if there is one, then click the add icon.
- Enter a name. Names don't have to be unique, but a name and asset combination does.
- Add a description if you want, and click Save.
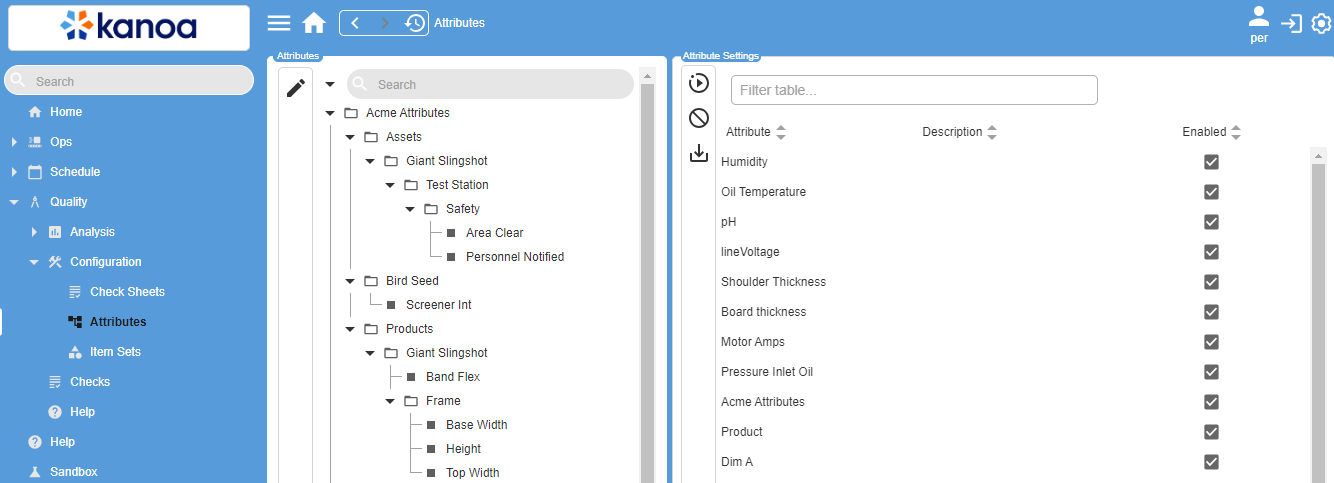
If the value can be read from an asset, add a Data Source. Choose the asset and tag, and set Scale Factor or Ignore zero values if needed. The Developer Training covers tag-based attributes.
Reference Materials: Adding an Attribute - Create, edit and delete attributes.
Adding Attribute
Assets can be added and edited by clicking the
Edit Attribute button on the left view. This will open the Attribute Editor popup.Attributes are organized in a hierarchy based on their assignment within a parent attribute. To create a new attribute, first select its intended parent attribute from the attribute tree on the left. Click the
icon, which clears the form for the addition of a new attribute. If no parent attribute is assigned, it will reside at the top level.Each attribute requires a name. Attribute names do not need to be unique. In fact, identical names should be used such as ‘Dryer Temperature’ for comparison of similar attributes across assets. However, attribute name and asset combinations must be unique.
The form provides additional fields to add a description or Enable/Disable the attribute. Click the Save button after creating or editing an attribute.
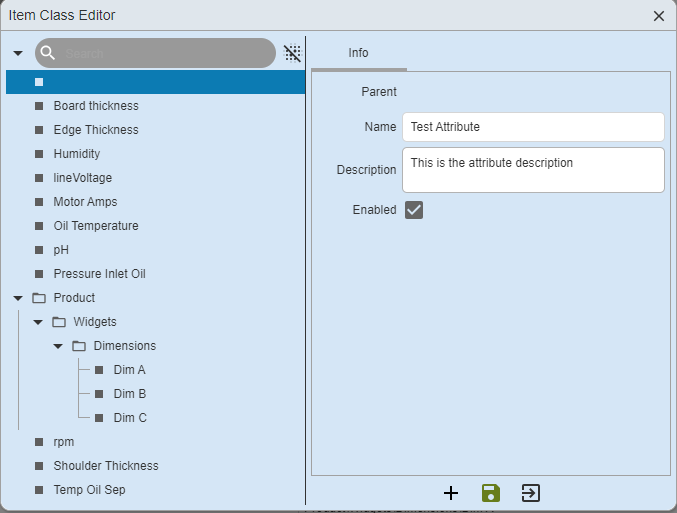
Attributes can be deleted from the main Attributes screen by selecting an attribute and clicking the
Delete Attribute button. Click OK when the deletion confirmation popup opens. To configure attribute settings, such as data source or tolerances, select the attribute from the table on the right. Then, click the View Attribute Settings button. If you have security privileges, the fields can be edited from this popup. Otherwise, the Attribute Detail Editor will be in a view only mode.Set Tolerances
Select an attribute and click View Attribute Settings. On its tolerance tab, click Add Tolerance. Leave the Asset, Item and Item Set fields blank to apply the tolerance to all items. Or choose an asset, an item or an item set.
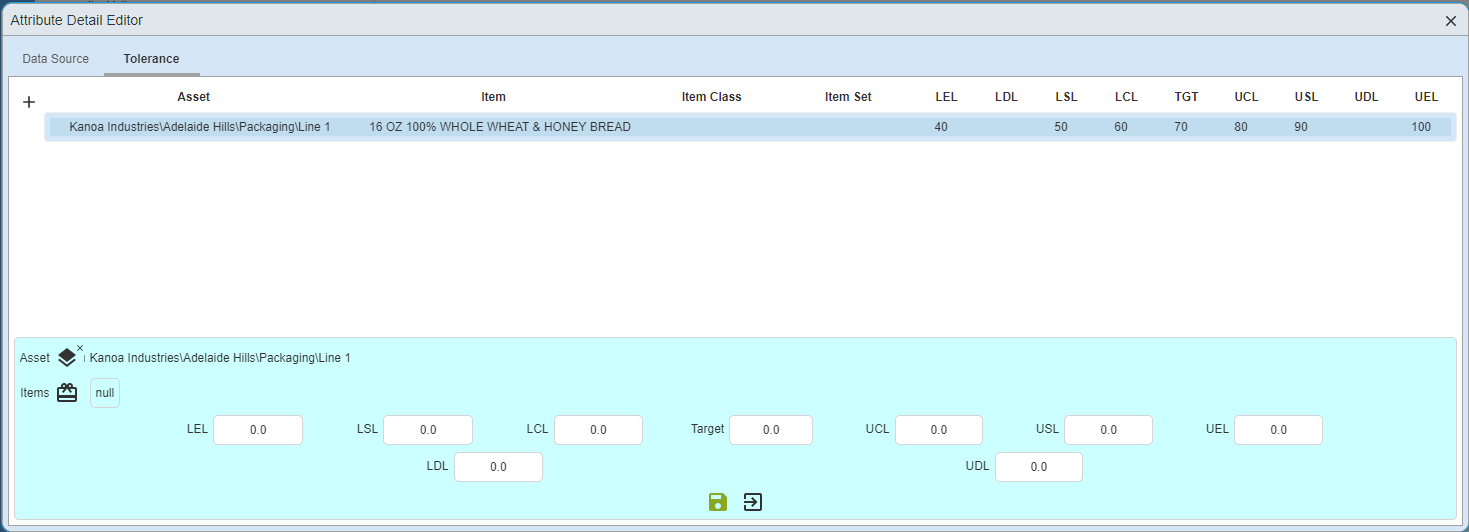
When a check is taken, Kanoa picks the tolerance in this order:
- A tolerance for the current item.
- A tolerance for the item set the item belongs to.
- The tolerance for all items.
Only enabled tolerances count. Clear Enabled to stop one applying without deleting it.
Each tolerance has these limits:
| Limit | What it does |
|---|---|
| LEL / UEL | The lowest and highest value that can be entered. |
| LSL / USL | The pass or fail limits. A value outside them fails and shows red. |
| LCL / UCL | Control limits. A value outside them still passes but shows orange. |
| Target | The ideal value. |
For example, the FAI Diameter for Coupling Pins has a target of 10.00 mm, spec limits of 9.90 and 10.10, and entry limits
of 9.85 and 10.15. A reading of 10.12 fails. A reading of 10.20 can't be entered.
The values must make sense. For example, the upper entry limit can't be smaller than the lower one, or Kanoa shows them in red.
Reference Materials: Tolerances - Limits, order of use and the Enabled setting.
Tolerances
One or more specifications (or tolerances) can be added to an attribute. A tolerance can be applied to all items by leaving the Asset, Item and Item Set fields blank. Otherwise, the Asset and Item selectors can be used to set tolerances by individual item, asset or item set. To add a new tolerance, click the
Add Tolerance button on the left of the Tolerance tab.When a check is to be taken, it will first check if a tolerance exists for the current item. If no tolerance is found, it will check if the current item belongs to an item set that has a tolerance. If no item set tolerance has been configured, it will use the tolerance defined for all items.
Only enabled tolerances are used. Clear a tolerance's Enabled checkbox to stop it applying without deleting it; the next best-fit enabled tolerance is used instead. A new tolerance starts enabled, and the table's Enabled column shows each one's setting.
Tolerance Parameters
- LEL Lower Entry Limit: Defines the minimum value that can be entered.
- LSL Lower Spec Limit: Defines the lower Pass / Fail condition. Failing values will be highlighted red.
- LCL Lower Control Limit: Defines the lower limit condition. Values below the LCL will be considered as passing but will be highlighted orange.
- Target: Defines the expected ideal value
- UCL Upper Control Limit: Defines the upper limit condition. Values exceeding the UCL will be considered as passing but will be highlighted orange.
- USL - Upper Spec Limit: Defines the upper Pass / Fail condition. Failing values will be highlighted red.
- UEL - Upper Entry Limit: Defines the maximum value that can be entered.
Tolerance parameter values must make logical sense or will be highlighted in red as a warning. For instance, the Upper Entry Limit cannot be smaller than the Lower Entry Limit.
Use the Attribute on a Check
- Open the check sheet and select the check item.
- In Data Properties, choose the attribute in Assign Attribute.
- In Specification, choose Attribute Tolerance.
Now one check sheet covers every item. The inspector sees the limits for the item they're checking. Turn on Dynamic to hide the check for items that have no tolerance.
Check Your Understanding
- Why use an item set instead of setting a tolerance per item?
- Kanoa finds no tolerance for the current item. What does it look for next?
- What happens when a reading is above the USL?
Answers
- You set the tolerance once for the whole set, so there's much less to manage.
- A tolerance for the item set the item belongs to, and then the tolerance for all items.
- It fails and shows red. A reading beyond the UEL can't be entered at all.